
source:ko zaw

Tuesday, August 16, 2011
ကြန္ျပဴတာမွာ Virus ႐ွိပါၿပီ Task Manger, Folder Options and Registry ကုိျပန္လည္စစ္ေဆးျဖင္း...
source:ko zaw
Restore My Computer
ဟိုတစ္ေန႔က စက္တစ္လံုး ၀င္းဒိုးမတက္လို႔ဆိုၿပီး လာအပ္တယ္။ ဖြင့္ၾကည့္လိုက္ေတာ့ တကယ္တမ္း ၀င္းဒိုးက တက္တယ္။ Loading ၿပီးသြားတဲ့အခါက် Desktop ေပၚလာရမယ့္အစား ဘာမွမေပၚဘဲ အျပာေရာင္ Screen ႀကီးဘဲ ေပၚေနတယ္။ (BSOD မဟုတ္ပါ)
အဲဒါနဲ႔ ကၽြန္ေတာ္ Task Manager ကို ေခၚၾကည့္လိုက္တယ္။ ေခၚလို႔ရတယ္။ အဲဒါနဲ႔ Task Manager ကိုသံုးၿပီး Windows Folder ထဲ လိုက္ၾကည့္ေတာ့ explorer.exe မရွိေတာ့တာကို ေတြ႔ရတယ္။ ေသခ်ာတယ္ေပါ့။ ဗိုင္းရပ္စ္က explorer.exe ကို ဖ်က္ပစ္လိုက္လို႔ Desktop ႀကီး မေပၚႏိုင္ျဖစ္ေနတာေလ။ ေနာက္မွ သိရတာက ဗိုင္းရပ္စ္က explorer.exe ကို ၀င္ကိုက္တဲ့အခ်ိန္ Kaspersky ႀကီးက ထေအာ္တာကို user က Delete ဆိုၿပီး ခ်လိုက္တာ ဗိုင္းရပ္စ္တင္မကဘဲ explorer.exe ပါ ပ်က္သြားတာပါ။
အဲဒါနဲ႔ ကၽြန္ေတာ္လည္း Memory Stick နဲ႔ တျခားစက္က explorer.exe ကို copy ကူးၿပီး အဲဒီစက္ထဲ ထည့္လိုက္တယ္။ restart လုပ္လိုက္တယ္။ ေဟာ Desktop ႀကီးေပၚလာၿပီ။ စိတ္ထဲမွာေတာ့ ၿပီးၿပီဆိုၿပီး ထင္ေနလိုက္တယ္။
မၿပီးေသးဘူးဗ်။ သေကာင့္သား ဗိုင္းရပ္စ္ေမႊသြားပံုက My Computer ဖြင့္လိုက္ရင္ My Computer မပြင့္ဘဲနဲ႔ Command Prompt ႀကီးပြင့္လာတယ္။ Start Menu က My Computer ပဲဖြင့္ဖြင့္၊ Desktop ေပၚက My Computer ပဲဖြင့္ဖြင့္ Command Prompt ပဲ ပြင့္လာတယ္။ ေနာက္ Windows Key နဲ႔ E ကို တြဲႏွိပ္လည္း Windows Explorer ပြင့္မလာေတာ့ဘူး။ The Parameter is incorret ဆိုၿပီး Dialog Box ေလးတစ္ခု က်လာတယ္။ ေခါင္းစားသြားတယ္ေပါ့ဗ်ာ။
Registry ထဲ ျပန္ျပင္ရမယ္ဆိုတာေတာ့ သိတယ္။ ဒါေပမဲ့ ဘယ္ေနရာ သြားျပင္ရမယ္မွန္းမသိဘူး။ သံုးနာရီေလာက္ၾကာေအာင္ လိုက္ေမႊၾကည့္လည္း မထူးဘူးဗ်ာ။ ေနာက္မွ Desktop ေပၚက My Computer ေပၚ Right Click ႏွိပ္ၾကည့္တဲ့အခါ CMD Shell ဆိုၿပီး item ေလးတစ္ခု တိုးၿပီး ေပၚေနတာကို သတိထားမိတယ္။ သဲလြန္စေတာ့ ရၿပီေပါ့ဗ်ာ။
အဲဒါနဲ႔ registry ထဲသြားၿပီး CMD Shell ဆိုၿပီး ရိုက္ၿပီး ရွာလိုက္တာ ဒီ key ေလးကို စေတြ႔ပါတယ္။
HKEY_CLASSES_ROOTFolder hellcmdcommand ေအာက္မွာ Default Value က C:WindowsSystem32cmd.exe ဆိုၿပီး ေတြ႔ရပါတယ္။
ကၽြန္ေတာ္ အဲဒီ Key ကုိ မသကၤာဘူး။ အဲဒါနဲ႔ တျခားစက္မွာသြားၾကည့္ေတာ့ တျခားစက္မွာ အဲဒီလို key မရွိဘူး။ ဒါနဲ႔ အဲဒီ key ကို ဖ်က္ပစ္လိုက္တယ္။ ၿပီးေတာ့ My Computer ကို ဖြင့္ၾကည့္လိုက္တယ္။ အရင္လို Command Prompt မပြင့္ေတာ့ဘဲ error တစ္ခု တက္လာတယ္။ နီးေတာ့ နီးလာၿပီေပါ့ဗ်ာ။
အဲဒါနဲ႔ တျခားစက္မွာရွိတဲ့ key အတိုင္း လိုက္ၿပီး ဖန္တီးလိုက္တယ္။
HKEY_CLASSES_ROOTFolder hell ေအာက္မွာ Explore ဆိုၿပီး key တစ္ခု ထပ္ေဆာက္လိုက္တယ္။ အဲဒီ Explore ေအာက္မွာ command ဆိုၿပီး key ထက္ေဆာက္လိုက္တယ္။ သူ႔ရဲ႕ Default Value ကို %SystemRoot%Explorer.exe /e,/idlist,%I,%L ဆိုၿပီး ေပးလိုက္တယ္။ ဆိုလိုရင္းကေတာ့ My Computer ကို ဖြင့္လိုက္ရင္ explorer.exe ကုိ သြားဖြင့္ခိုင္းလိုက္တာပါပဲ။ ေနာက္မွာပါတာေတြက Switch ေတြပါပဲ။ အဲဒီ Switch ေတြ အေၾကာင္းကိုေတာ့ ကၽြန္ေတာ္လည္း မသိပါဘူး။
ေနာက္ထပ္ HKEY_CLASSES_ROOTFolder hell ေအာက္မွာပဲ Open ဆိုၿပီး key တစ္ခု ေဆာက္လုိက္ပါတယ္။ အဲဒီ Open ေအာက္မွာ command ဆိုၿပီး Key တစ္ခု ထပ္ေဆာက္ပါတယ္။ သူ႔ရဲ႕ Default Value ကိုလည္း အေစာကအတိုင္းပဲ %SystemRoot%Explorer.exe /e,/idlist,%I,%L ဆိုၿပီး ေပးလိုက္ပါတယ္။
ၿပီးေတာ့ Registry Editor ကို ပိတ္လိုက္ပါတယ္။ My Computer ကို ဖြင့္ၾကည့္လိုက္ယ္။ ေဟာ My Computer မွ My Computer ႀကီး ပြင့္လာပါေၾကာင္း။
စာဖတ္သူေတြထဲက ကၽြန္ေတာ့္လိုမ်ိဳး My Computer ဖြင့္လုိက္လို႔ My Computer မပြင့္ဘဲ တျခားဟာေတြ ပြင့္လာတယ္ဆိုရင္ ေအာက္မွာေပးထားတဲ့ reg ဖိုင္ေလးကို download ဆဲြၿပီး double click ႏွိပ္ဖြင့္လိုက္ပါ။ ၿပီးရင္ Yes ကို ႏွိပ္လိုက္ပါ။ အဆင္ေျပသြားပါလိမ့္မယ္။ reg ဖိုင္ထဲမွာ တျခား ဘာ code မွ မပါပါဘူး။ စိတ္ခ်လက္ခ် သံုးႏိုင္ပါတယ္။
Download Restore My Computer Registry
source: IT Men
မိမိ ip address ကုိ ေဖ်ာက္ေပးမည့္ Auto Hide IP 4.6.2.6
 ကဲဒါကေတာ့ သိထားတဲ့အတုိင္း မိမိ ip address ကုိ ဖမ္းလုိ႔မမိေအာင္ ip address အစစ္အမွန္ကုိ ေဖ်ာက္ေပးႏုိင္တဲ့ program ပါပဲ . လုိခ်င္သည့္သူမ်ား ေအာက္တြင္ Download လုပ္ယူႏုိင္ပါတယ္ . Link ကုိ ႏွစ္ေနရာကေန တင္ထားေပးပါတယ္ . လုိအပ္ရင္ ထပ္ၿပီး Download link ေတြ ျဖည့္ေပးသြားပါ့မယ္ . ip hider တင္ေပးခါမွ ဒီေကာင္ေလးကုိ သုံးၿပီး ေလွ်ာက္ၿပီးေတာ့ေတာ့ ဘေလာဂ္ေတြကုိ လုိက္ေႏွာက္ယွက္တဲ့သူမ်ား အဲ့လုိမလုပ္ၾကပါနဲ႔ . အက်ိဳးရွိတဲ့ေနရာ ေတြမွာပဲ သုံးေစခ်င္တာ ကၽြန္ေတာ့္ေစတနာပါ .
 Download ifile.it ၊ Download mediafire
source:ညီေနမင္း
Windows XP မွာ start နဲ႔ shutdown ျမန္ေအာင္လုပ္နည္း...
XP မွာ start ႏွင္႔ shutdown ျမန္ေအာင္လုပ္နည္းေလးပါ..။
XP အသုံးျပဳသူေတြ အတြက္ အသုံး၀င္မယ္ထင္လုိ႔ ဒီပုိစ္႔ေလးကုိ တင္လုိက္တာပါ…။
အရင္ဆုံး start ၿမန္ေအာင္လုပ္နည္းကုိ ေဆြးေႏြးပါ႔မယ္….။
ထုံးစံအတုိင္း start Run (or) win + R ကုိ သြားလုိက္ပါ…။
Run Box တြင္ regedit ကုိရုိက္ထည္႔ၿပီး ok ေပးလုိက္ပါ.။
ေပၚလာတဲ႔ Register Editor Box မွာ ေအာက္မွာေရးးထားတဲ႔ အတုိင္း အဆင္႔ဆင္႔သြားလုိက္ပါ...။
HKEY_LOCAL_MACHINE >> SYSTEM >> CurrentControlSet >> Control >> Session Manager >>
Memory Management >> Prefetchparameters ဆုိတာကုိ double click ေပးလုိက္ပါ..။
ေဘးက Box ထဲမွာ EnablePrefetcher ဆုိတာကိုလုိက္ရွာၿပီး right click >> Modify >> Value data မွာ 3 ေနရာမွာ 5 လုိ႔ေျပာင္းၿပီး ok ေပးလုိက္ပါ ..။
ဒါဆုိရင္ start ျမန္ေအာင္ လုပ္နည္းၿပီးပါၿပီ...။
ေနာက္တစ္ခု Shutdown ျမန္ေအာင္လုပ္နည္းကို ေဆြးေႏြးပါမယ္.. ။
အရင္ဆုံး အေပၚက အတုိင္းပဲ start Run (or) win + R ကုိ သြားလုိက္ပါ…။
Run Box တြင္ regedit ကုိရုိက္ထည္႔ ok ေပးၿပီး
ေအာက္မွာ ေရးထားတဲ႔ အတုိင္း အစဥ္လုိက္လုပ္ၾကည္႔ပါ...။
HKEY_CURRENT_USER>> Control Panel >> Desktop ထိေရာက္ေအာင္သြားပါ..
ေဘးက Box မွာ AutoEndTasks ဆုိတာကိုရွာၿပီး Value data မွာ 1 ေျပာင္းေပးလုိက္
HungAppTimeout နဲ႔ WaitToKillAppTimeout ႏွစ္ခုလုံးကို 1000 လုိ႔ေျပာင္းေပးလုိက္ပါ..။
အရမ္းၾကီးျမန္ခ်င္တယ္ဆုိရင္ေတာ႔ ကုိယ္စိတ္ၾကဳိက္ ေျပာင္းၾကည္႔ေပါ႔ က်ေနာ္ကေတာ႔ 1000 လုိ႔ပဲေျပာင္းထားပါတယ္..။
နွစ္ခုလုံး လုပ္ၿပီးၿပီဆုိရင္ေတာ႔ ကြန္ပ်ဴတာကို restart ခ်လုိက္ပါခင္ဗ်ာ…။
တက္တာေရာ က်တာပါ..ျမန္ျမန္ဆန္ဆန္ျဖစ္ေနတာကို ေတြ႔ရမွာပါ ..။
မွတ္ခ်က္။ျမန္မာအင္ဂ်င္နီယာဖိုရမ္မွမွီျငမ္းထားသည္...
source: ko zaw
Start Menu ကုိ အရွိန္ျမႇင့္လုိက္ပါ
မိမိ သံုးေနတဲ့ ကြန္ပ်ဴတာကုိ ျမန္ဆန္စြာ အသံုးျပဳႏုိင္ရန္ နည္းလမ္းေတြထဲက တစ္ခု ျဖစ္တဲ့ Start Menu အရွိန္ျမႇင့္နည္းကုိ ေဖာ္ျပေပးလိုက္ပါတယ္။ ေအာက္ပါအဆင့္တုိင္း ျပဳလုပ္ပါ-
၁) Start မွ Run ကုိ ဖြင့္ပါ။
၂) Run box တြင္ regedit ကုိ ႐ုိက္ပါ။
၃) regedit box ေပၚလာရင္ HKEY_CURRENT_USER ကုိ ေရြးပါ။ ၿပီးရင္ Control Panel မွ Desktop ကုိ ဖြင့္ပါ။
၄) ညာဘက္တြင္ MenuShowDelay ဆုိတာကုိ ရွာပါ။ ေတြ႕ရင္ Double Click လုပ္ပါ။
၅) Value Data (၁၀၀)ကုိ (၄၀၀)ေပးလိုက္ပါ။
source:ေမာင္ေစတနာ
၁) Start မွ Run ကုိ ဖြင့္ပါ။
၂) Run box တြင္ regedit ကုိ ႐ုိက္ပါ။
၃) regedit box ေပၚလာရင္ HKEY_CURRENT_USER ကုိ ေရြးပါ။ ၿပီးရင္ Control Panel မွ Desktop ကုိ ဖြင့္ပါ။
၄) ညာဘက္တြင္ MenuShowDelay ဆုိတာကုိ ရွာပါ။ ေတြ႕ရင္ Double Click လုပ္ပါ။
၅) Value Data (၁၀၀)ကုိ (၄၀၀)ေပးလိုက္ပါ။
source:ေမာင္ေစတနာ
Connection က်ေနစဥ္ Gtalk,Gmail
အဖြဲ႔၀င္မ်ားအားConnection က်ေနစဥ္ Gtalk,Gmail
ဖြင့္နုိင္ေစရန္ရည္ရြယ္ကာပို႔ျခင္းျဖစ္သည္.
Gmail ဖြင့္လိုလွ်င္-
-mozilla ကို ဖြင့္ပါ။
-mozilla ထဲက Tools ကိုဖြင့္ပါ။
-Tools ထဲက Options ကိုႏွိပ္ပါ။
-Options ထဲက Advanced ကိုႏွိပ္ပါ။
-Advanced ထဲက settings ကိုႏွိပ္ပါ။
-Settings ထဲက manual poxy ကို ႏွိပ္ပါ။
-manual poxy ေအာက္တြင္ HTTP poxy ေပၚလာလိမ့္မည္။
ေပၚလာလွ်င္HTTP poxy box တြင္
212.93.193.72 ကိုရုိက္လိုက္ပါ။
ေဘးက Post box တြင္
443 ကိုရိုက္ထည့္လိုက္ပါ။
*အားလံုးၿပီးသြားလွ်င္ OK ႏွင့္ထြက္လိုက္ပါ။
ဒါဆို ရင္ Gmail ဖြင့္လို႔ရပါၿပီ။
Gtalk ဖြင္လိုလွ်င္- gtalk settings ထဲ၀င္ၿပီး connection ကိုႏွိပ္ပါ။ ၿပီးရင္
use the following poxy ကိုႏွိပ္
Host box မွာ 212.93.193.72 ကိုရုိက္ထည့္လိုက္ပါ
post box မွာ 443 ကိုရုိက္ထည့္လိုက္ပါ။
ၿပီးရင္ Gtalk ၀င္လို႔ရပ္ၿပီ။
************ သူငယ္ခ်င္းတို႔ CONNECTION က်ျခင္းမွကင္းေ၀းပါေစ************
poxy no. ေနရာမွာ 212.93.193.72 ဆိုတာအျပင္... 212.93.193.82
,212.93.193.83, 212.93.193.84, block.appleak.net တို႔ကို အဆင္ေျပသလို႔
အစားသံုးသြားလို႔႔ရပါတယ္။ prot ကေတာ့ 443 ပဲျဖစ္ပါတယ္...
source:foreverfriends-တာဝရရင္ခြင္ ထြန္း
MP3 player 1GB ထဲကုိ MP3 song 1000 ထည့္နည္း
လုပ္နည္းကေတာ့
JetAudio အား ဖြင့္လုိက္ပါ။
ျပီးရင္ conversion ကုိ click လုပ္ျပီးရင္ Scurce ေအာက္က Add Files ကုိ click လုိက္ပါ။
မိမိၾကိဳက္တဲ့ song ကုိ select ျပီး open ကုိ click ေပးလုိက္ပါ။ ျပီးရင္ Target ေအာက္က File naming မွာ
မိမိၾကိဳက္ရာ name ကုိ ေပးလုိက္ပါ။ ျပီးရင္ Create new files in the following folder ကုိ click ေပးလုိက္ပါ။
ၾကိဳက္တဲ့ေနရာမွာ save လုိ႔ရပါတယ္။ ျပီးရင္...Output format မွာ WMA-Windows Media Audio 7 ကုိ
ေရြးလုိက္ပါ။ ျပီးရင္ configuration ကုိ click ေပးလုိက္ပါ။ ျပီးရင္...Profiles မွာ
Audio for FM radio quality for dial-up mondems(28.8Kbps stereo) ကုိ ေရြးလုိက္ပါ။
ျပီးရင္... ok ေပးလုိက္ ...start ကုိ click လုိက္ပါ။ ဒါဆုိရင္ မိမိသီခ်င္းက MB ေတြေလွ်ာ့သြားပါလုိက္မယ္။
အဆင္ေျပပါေစဗ်ာ...
source:
software မပါဘဲ folder ကုိ ေလာ့ခ်မယ္
ကြ်န္ေတာ္သိထားတဲ့ folder lock ခ်နည္းေလးပါ။ ဒါေပမယ့္ အဲဒီနည္းက software မပါေတာ့
ေတာ္ေတာ္ေလးေတာ့ အသုံး၀င္ပါတယ္။ သိျပီးသားေတြဆုိရင္ေတာ့ sorry ဗ်ာ။
လုပ္နည္းကေတာ့ ဒီလုိပါ....
ကုိယ္လုပ္ခ်င္တဲ့ folder ကုိ နာမည္းတစ္ခုေပးပါ။
ဥပမာ_ star လုိ႔ ေပးလုိက္တယ္။ C:drive ထဲမွာ ထားလုိက္တယ္။
start မွ run ထဲမွာ attrib +s +h C:\star လုိ႔ ရိုက္ထည့္လုိက္ပါ။ ဒါဆုိရင္ star folder က C: ထဲမွာ မရွိေတာ့ပါဘူး။ ေပ်ာက္သြားပါလိမ့္မယ္။
ျပန္ေဖာ္ခ်င္တယ္ဆုိရင္ attrib -s -h C:\star လုိ႔ ျပန္ရုိက္ထည့္လုိက္ပါ။
ျပန္ေပၚလာပါလိမ့္မယ္။ D,E တုိ႔မွာ ထားခ်င္ရင္လည္း C ေနရာမွာ D,E တုိ႔ ထည့္လုိက္ရုံပါပဲ။
ဒါေပမယ့္ D မွာ ထားတယ္ဆုိရင္ first page မွာပဲ လုပ္လုိ႔ရပါတယ္။ folder ေတြထဲမွာ လုပ္တာ မရပါဘူး။
D ဆုိရင္ D ရဲ႕ first page မွာ ထားလုိ႔ရပါတယ္။ လုပ္ၾကည့္ပါခင္ဗ်ာ။
ဘယ္ႏုိင္ငံက ေမးလ္ပုိ႕တာလဲ ?
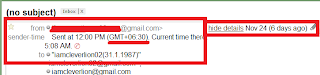
ကၽြန္ေတာ္ Gmail ႏွင္႕ Gtalk လြယ္ကူစြာ အသုံးျပဳနည္းကုိ ကၽြန္ေတာ္ အကုိရဲ႕ ကူညီမႈနဲ႕ အေတာ္အတန္႕ ျပည္႕စုံေအာင္ ကၽြန္ေတာ္တုိ႕ စာအုပ္ ျပဳစုခဲ႔ပါတယ္။ ေနာက္ထပ္လည္ ျပည္႕စုံေအာင္ Version 2 ဆုိျပီ ထုတ္ဖုိ႕ ရည္ရယ္ထားပါတယ္။ အခုလည္ ကၽြန္ေတာ္ကုိ အေမးအမ်ားဆုံး ျဖစ္တဲ႕ ဘယ္က ခ်က္ေနတာကုိ ဘယ္လုိ သိႏုိင္လဲလုိ႕ ကၽြန္ေတာ္ကုိ ခဏခဏ ေမးပါတယ္ ကၽြန္ေတာ္ သိသင္႕ သေလာက္ နည္းေတြကုိလဲ ကၽြန္ေတာ္ျပဳစုခဲ႕တဲ႕ စာအုပ္မွာ တင္ျပခဲ႔ျပီျဖစ္ပါတယ္။ အခုတင္ျပမည္႕ နည္းကေတာ႕ ကၽြန္ေတာ္တုိ႕ အားလုံးသတိမထားမိတဲ႕ နည္းေလးျဖစ္မွာပါ။ သိတဲ႕သူလည္ သိမွာေပါ႔။ ကၽြန္ေတာ္ အခု ျပဳစုေနတဲ႕ စာအုပ္မွာ ေရးျပီသာေတာ႕ ၾကာပါျပီ ဒါေပးမဲ႕ Blog မွာေတာ႕ မတင္ျဖစ္ခဲ႕ပါဘူး။ အခုနည္းကေတာ႕ ကၽြန္ေတာ္တုိ႕ မိမိကုိ ေမးလ္ပုိ႕တဲ႕သူက ဘယ္က ပုိ႕တာလည္ဆုိတာကုိ Time Zone နဲ႕ လုိက္တာ ျဖစ္ပါတယ္။ ဘာမွ မခတ္ခဲတဲ႕နည္းေလးျဖစ္ပါတယ္။ အေတာ္မ်ားမ်ားကုိ ကၽြန္ေတာ္ စမ္းၾကည္႕ပါတယ္။ အဆင္ေျပပါတယ္။ Chat Mail ေတြ Auto Reply ေမးလ္ေတြေတာ႕ ၾကည္႕လုိ႕မရပါဘူး။ ေမးလ္ပုိ႕မွသာ ၾကည္႕လုိ႕ရမွာျဖစ္ပါတယ္။ Auto Reply ကုိ Time Zone က -7 ျပေနပါမည္။ -7 Time Zone က အေမရိကန္ Time Zone ျဖစ္ပါတယ္။ ဘာလုိ႕လဲဆုိေတာ႕ မိမိက ေမးလ္မွာ Auto Reply လုပ္ထားတာျဖစ္တဲ႕အခါ ဘယ္သူ ေမးလ္ပုိ႔ပုိ႔ Auto mail က Reply လုပ္ေနလုိ႕ျဖစ္ပါတယ္။ ကၽြန္ေတာ္တုိ႕ ျမန္မာျပည္က ပုိ႕တဲ႕ ေမးလ္ဆုိ ( GMT +6:30) ျဖစ္ပါတယ္။ ဒါက ဥပမာ ေျပာျပတာပါ။ ေအာက္မွာ ၾကည္႕လိုက္ပါ။
1. မိမိ Mail ကုိ Sign In လုပ္လုိက္ပါ။
2. Setting ကုိ click လုိက္ပါ။ (မိမိ Mail Box ရဲ႕ ညာဘက္ေထာင္႕မွာ ရွိပါတယ္။)
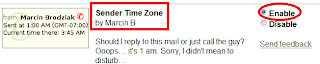
3. Labs ကုိ ထပ္ click လုိက္ပါ။ ေအာက္ပါအတုိင္း က်လာပါမည္။ Sender Time Zone ကုိ Enable ေပးလုိက္ပါ။ ျပီရင္ ေအာက္နားမွ Save Changes ကုိ click လုိက္ပါ။
4. အထပ္ပါအတုိင္းSettings မွာ ျပင္ျပီတာနဲ႕ မိမိဆီကုိ သူငယ္ခ်င္းက ေမးလ္ပုိ႕တာနဲ႕ Show Detail ကုိႏုိပ္လုိက္တာနဲ႕ ေအာက္ပါအတုိင္း Time Zone ကုိ ေတြ႕ရမွာ ျဖစ္ပါ တယ္။ မိမိက Time Zone ေတြနဲ႕ ႏုိင္ငံေတြ မတြဲမိရင္ နံပတ္ (၅)မွာ တင္ျပထားတဲ႕ ဆုိဒ္ေတြမွာ Time Zone ကုိ ၾကည္႕ႏုိင္ပါတယ္။ ေအာက္မွာ ကၽြန္ေတာ္ ဥပမာ ျပတာ ကေတာ႕ GMT + 6:30 ျဖစ္တာေၾကာင္႕ ျမန္မာျပည္က သူငယ္ခ်င္းက ေမးလ္ပုိ႕တာ ျဖစ္ပါတယ္။ ကၽြန္ေတာ္ ႏုိင္ငံ (၄)ႏုိင္ငံကို စမ္းထားျပီျဖစ္ပါတယ္။ အားလုံးမွန္ပါတယ္။ ဒါေပးမဲ႕ အေသစိတ္ကုိေတာ႕ မသိႏုိင္ပါ။ ႏုိင္ငံကုိသာ သိႏုိင္ပါတယ္။
5. Time Zone ေတြကုိ မသိရင္ ေအာက္က ဆုိဒ္ႏွစ္ခုမွာ ရွာေဖြၾကည္႕ႏုိင္ပါတယ္။
• http://antonio.mccinet.ru/net/time.html
•http://wwp.greenwichmeantime.com/time-zone/asia/china/hong-kong/time.htm
source:knowledge
1. မိမိ Mail ကုိ Sign In လုပ္လုိက္ပါ။
2. Setting ကုိ click လုိက္ပါ။ (မိမိ Mail Box ရဲ႕ ညာဘက္ေထာင္႕မွာ ရွိပါတယ္။)
3. Labs ကုိ ထပ္ click လုိက္ပါ။ ေအာက္ပါအတုိင္း က်လာပါမည္။ Sender Time Zone ကုိ Enable ေပးလုိက္ပါ။ ျပီရင္ ေအာက္နားမွ Save Changes ကုိ click လုိက္ပါ။

4. အထပ္ပါအတုိင္းSettings မွာ ျပင္ျပီတာနဲ႕ မိမိဆီကုိ သူငယ္ခ်င္းက ေမးလ္ပုိ႕တာနဲ႕ Show Detail ကုိႏုိပ္လုိက္တာနဲ႕ ေအာက္ပါအတုိင္း Time Zone ကုိ ေတြ႕ရမွာ ျဖစ္ပါ တယ္။ မိမိက Time Zone ေတြနဲ႕ ႏုိင္ငံေတြ မတြဲမိရင္ နံပတ္ (၅)မွာ တင္ျပထားတဲ႕ ဆုိဒ္ေတြမွာ Time Zone ကုိ ၾကည္႕ႏုိင္ပါတယ္။ ေအာက္မွာ ကၽြန္ေတာ္ ဥပမာ ျပတာ ကေတာ႕ GMT + 6:30 ျဖစ္တာေၾကာင္႕ ျမန္မာျပည္က သူငယ္ခ်င္းက ေမးလ္ပုိ႕တာ ျဖစ္ပါတယ္။ ကၽြန္ေတာ္ ႏုိင္ငံ (၄)ႏုိင္ငံကို စမ္းထားျပီျဖစ္ပါတယ္။ အားလုံးမွန္ပါတယ္။ ဒါေပးမဲ႕ အေသစိတ္ကုိေတာ႕ မသိႏုိင္ပါ။ ႏုိင္ငံကုိသာ သိႏုိင္ပါတယ္။

5. Time Zone ေတြကုိ မသိရင္ ေအာက္က ဆုိဒ္ႏွစ္ခုမွာ ရွာေဖြၾကည္႕ႏုိင္ပါတယ္။
• http://antonio.mccinet.ru/net/time.html
•http://wwp.greenwichmeantime.com/time-zone/asia/china/hong-kong/time.htm
source:knowledge
Drive တစ္ခု ထပ္ခဲြမယ္
တစ္ေန႔က မိတ္ေဆြတစ္ေယာက္က သူရဲ႕ Hard disk (D:) က ျပည့္ေနလုိ႔ ကူညီပါအံုးတဲ့။ ဒါနဲ႔ သူစက္ရဲ႕ System (C:) ကုိ ၾကည့္လုိက္ေတာ့ ပုိေနတာေတြ ရွိေသးတယ္။ ဒါနဲ႔ စိတ္မပူနဲ႔ လုပ္ေပးမယ္ဆုိၿပီး လုပ္ေပးခဲ့တယ္။ G: drive တစ္ခု ထပ္ေပၚလာတာေပါ့။ လုပ္နည္းေလးကေတာ့ ေအာက္ကအတုိင္းပဲ။
(၂) ၿပီးရင္ Disk Management ကုိ Click လုပ္။ ညာဘက္မွာ C: , D: ဆုိတာ ေပၚလာလိမ့္မယ္။ ေအာက္ကအတုိင္း။

(၃) C: အကြက္ကုိ Right Click လုပ္။ Shrink Volume ဆုိတာကုိ ေရြး။ ခဏေစာင့္။
(၄) Box တစ္ခု က်လာလိမ့္မယ္။ Enter the amount of space to shrink in MB: ဆုိတဲ့အကြက္က C: မွာ လြတ္ေနတဲ့ ပမဏာပဲ။ အဲဒီအကြက္ အကုန္လံုးကုိ မယူသင့္တဲ့အတြက္ မိမိ လုိခ်င္သေလာက္ခဲြယူ။
(ဥပမာ- C: က 60 GB ဆုိပါေတာ့။ သံုးထားတာက 30 GB ။ ဒါဆုိ 30 GB ပုိေနတယ္။ အကုန္လံုး မယူသင့္တဲ့အတြက္ 20 GB ေလာက္ပဲ ခဲြယူပါ။ 20 GB ဆုိရင္ 20240 လုိ ႐ုိက္ထည့္လုိက္။ ၿပီးရင္ Shrink ကုိ ႏွိပ္။
(၅) ဒါဆုိ Drive တစ္ခု ထပ္ေပၚလာလိမ့္မယ္။ အဲဒီ Drive ကုိ Right Click လုပ္။ New ဆုိတာနဲ႔ သူေျပာတဲ့ အဆင့္ေတြ အတုိင္း လုပ္သြားလိုက္။ ဒါဆုိ Drive တစ္ခု ပုိထြက္လာၿပီေပါ့။
source:ေမာင္ေစတနာ
မ်ိဳးသူရေရးထားတဲ့ (Internet for young starter)
 ဒါကေတာ့ ဆရာမ်ိဳးသူရေရးတဲ့ ..............
ေန႔စဥ္သုံးအင္တာနက္ (အင္တာနက္စတင္ သုံးစြဲသူမ်ားအတြက္)
ဆုိတဲ့ စာအုပ္ေလးပါ !!
(1) email
(2) Create New Gmail Account
(3) New Account ေဆာက္စဥ္အခက္အခဲမ်ား
(4) e-mail ေပးပုိ႔ျခင္း
(5) e-mail Attach တြဲပုိ႔ျခင္း အစရွိတဲ့ အေၾကာင္းအရာမ်ိဳးစုံႏွင့္ search Engine
(1) email
(2) Create New Gmail Account
(3) New Account ေဆာက္စဥ္အခက္အခဲမ်ား
(4) e-mail ေပးပုိ႔ျခင္း
(5) e-mail Attach တြဲပုိ႔ျခင္း အစရွိတဲ့ အေၾကာင္းအရာမ်ိဳးစုံႏွင့္ search Engine
အေၾကာင္း ေတြကုိပါ ေရးသားထားတာကုိ ေတြ႕ရမွာပါ .. ဆရာမ်ိဳးသူရနဲ႔ ဦးေဇာ္လင္းတုိ႔ ဆုိတာ တစ္ကယ္ေတာ့ ကၽြန္ေတာ္တုိ႔ကုိ မ်က္စိဖြင့္ေပးတဲ့ ေရွ႕ေဆာင္လမ္းျပေတြပါ ..သူတုိ႔ေတြ ထုတ္တဲ့ စာအုပ္ေတြကုိ နားလည္သေလာက္ဖတ္ၿပီးေတာ့မွ ကြန္ပ်ဴတာကုိ တတ္ကၽြမ္းက်င္ခဲ့တဲ့စိတ္ေတြ ျဖစ္ေပၚလာခဲ့တာပါ .. အခု ကၽြန္ေတာ္ sharing ျပန္ခြဲေပးထားတဲ့စာအုပ္ေလးကုိ အင္တာနက္ စသုံးတဲ့သူေတြအတြက္ တစ္ကယ္မလုိဘူး လုိတယ္ဆုိတာကုိ ဖတ္ၿပီးလုိ႔ စာရြက္ ၅ ရက္မျပည့္ခင္ သိပါလိမ့္မယ္ . ဒီစာအုပ္ျဖစ္လာေအာင္ scanner ဖတ္ၿပီး ပင္ပင္ပန္းပန္းလုပ္ခဲ့တာ ဘယ္သူဆုိတာကုိ မသိေပမယ့္ တစ္ကယ္ကုိ စိတ္ထဲကေန လႈိက္လႈိက္လွဲလွဲ ေက်းဇူးအထူးပဲတင္ပါတယ္ .. ကၽြန္ေတာ္က အခုလက္ရွိ ျမန္မာျပည္မွာ မရွိေတာ့ အဲ့ဒီ့အလုပ္ကုိ လက္လွမ္းမမီတာ တစ္ခုပါပဲ . တစ္ကယ္လုိ႔သာ ျမန္မာျပည္မွာရွိခဲ့ရင္ ေန႔တုိင္း scanner နဲ႔ ကုိ ခြါမွာမဟုတ္ဘူး.. အဲ့ဒါ ကၽြန္ေတာ့္စိတ္ထဲက အရွိအတုိင္းေျပာတာပါ ..
Download mediafire ၊ Download ifile.it ၊ Download rapidshare ၊ Download megaupload ၊ Download 4shared ၊ Download nyinaymin.net
(ျမန္မာမိသားစုဖုိရမ္မွ AZM တင္ထားေသာ စာအုပ္အား ျပန္လည္ Download လုပ္ယူထားေသာ စာအုပ္ျဖစ္ပါသည္။)
source:
ကြန္ပ်ဴတာအတုိေကာက္အေခၚအေ၀ၚေလးေတြ
ADSL - Asymmetric Digital Subscriber Line
AGP - Accelerated Graphics Port
ALI - Acer Labs, Incorporated
ALU - Arithmetic Logic Unit
AMD - Advanced Micro Devices
APC - American Power Conversion
ASCII - American Standard Code for Information Interchange
ASIC - Application Specific Integrated Circuit
ASPI - Advanced SCSI Programming Interface
AT - Advanced Technology
ATI - ATI Technologies Inc.
ATX - Advanced Technology Extended
â€" B â€"
BFG - BFG Technologies
BIOS - Basic Input Output System
BNC - Barrel Nut Connector
â€" C â€"
CAS - Column Address Signal
CD - Compact Disk
CDR - Compact Disk Recorder
CDRW - Compact Disk Re-Writer
CD-ROM - Compact Disk - Read Only Memory
CFM - Cubic Feet per Minute (ft�/min)
CMOS - Complementary Metal Oxide Semiconductor
CPU - Central Processing Unit
CTX - CTX Technology Corporation (Commited to Excellence)
â€" D â€"
DDR - Double Data Rate
DDR-SDRAM - Double Data Rate - Synchronous Dynamic Random Access Memory
DFI - DFI Inc. (Design for Innovation)
DIMM - Dual Inline Memory Module
DRAM - Dynamic Random Access Memory
DPI - Dots Per Inch
DSL - See ASDL
DVD - Digital Versatile Disc
DVD-RAM - Digital Versatile Disk - Random Access Memory
â€" E â€"
ECC - Error Correction Code
ECS - Elitegroup Computer Systems
EDO - Extended Data Out
EEPROM - Electrically Erasable Programmable Read-Only Memory
EPROM - Erasable Programmable Read-Only Memory
EVGA - EVGA Corporation
â€" F â€"
FC-PGA - Flip Chip Pin Grid Array
FDC - Floppy Disk Controller
FDD - Floppy Disk Drive
FPS - Frame Per Second
FPU - Floating Point Unit
FSAA - Full Screen Anti-Aliasing
FS - For Sale
FSB - Front Side Bus
â€" G â€"
GB - Gigabytes
GBps - Gigabytes per second or Gigabits per second
GDI - Graphical Device Interface
GHz - GigaHertz
â€" H â€"
HDD - Hard Disk Drive
HIS - Hightech Information System Limited
HP - Hewlett-Packard Development Company
HSF - Heatsink-Fan
â€" I â€"
IBM - International Business Machines Corporation
IC - Integrated Circuit
IDE - Integrated Drive Electronics
IFS- Item for Sale
IRQ - Interrupt Request
ISA - Industry Standard Architecture
ISO - International Standards Organization
â€" J â€"
JBL - JBL (Jame B. Lansing) Speakers
JVC - JVC Company of America
- K â€"
Kbps - Kilobits Per Second
KBps - KiloBytes per second
â€" L â€"
LG - LG Electronics
LAN - Local Are Network
LCD - Liquid Crystal Display
LDT - Lightning Data Transport
LED - Light Emitting Diode
â€" M â€"
MAC - Media Access Control
MB � MotherBoard or Megabyte
MBps - Megabytes Per Second
Mbps - Megabits Per Second or Megabits Per Second
MHz - MegaHertz
MIPS - Million Instructions Per Second
MMX - Multi-Media Extensions
MSI - Micro Star International
â€" N â€"
NAS - Network Attached Storage
NAT - Network Address Translation
NEC - NEC Corporation
NIC - Network Interface Card
â€" O â€"
OC - Overclock (Over Clock)
OCZ - OCZ Technology
OEM - Original Equipment Manufacturer
â€" P â€"
PC - Personal Computer
PCB - Printed Circuit Board
PCI - Peripheral Component Interconnect
PDA - Personal Digital Assistant
PCMCIA - Peripheral Component Microchannel Interconnect Architecture
PGA - Professional Graphics Array
PLD - Programmable Logic Device
PM - Private Message / Private Messaging
PnP - Plug 'n Play
PNY - PNY Technology
POST - Power On Self Test
PPPoA - Point-to-Point Protocol over ATM
PPPoE - Point-to-Point Protocol over Ethernet
PQI - PQI Corporation
PSU - Power Supply Unit
â€" R â€"
RAID - Redundant Array of Inexpensive Disks
RAM - Random Access Memory
RAMDAC - Random Access Memory Digital Analog Convertor
RDRAM - Rambus Dynamic Random Access Memory
ROM - Read Only Memory
RPM - Revolutions Per Minute
â€" S â€"
SASID - Self-scanned Amorphous Silicon Integrated Display
SCA - SCSI Configured Automatically
SCSI - Small Computer System Interface
SDRAM - Synchronous Dynamic Random Access Memory
SECC - Single Edge Contact Connector
SODIMM - Small Outline Dual Inline Memory Module
SPARC - Scalable Processor ArChitecture
SOHO - Small Office Home Office
SRAM - Static Random Access Memory
SSE - Streaming SIMD Extensions
SVGA - Super Video Graphics Array
S/PDIF - Sony/Philips Digital Interface
â€" T â€"
TB - Terabytes
TBps - Terabytes per second
Tbps - Terabits per second
TDK - TDK Electronics
TEC - Thermoelectric Cooler
TPC - TipidPC
TWAIN - Technology Without An Important Name
â€" U â€"
UART - Universal Asynchronous Receiver/Transmitter
USB - Universal Serial Bus
UTP - Unshieled Twisted Pair
â€" V â€"
VCD - Video CD
VPN - Virtual Private Network
â€" W â€"
WAN - Wide Area Network
WTB - Want to Buy
WYSIWYG - What You See Is What You Get
â€" X â€"
XGA - Extended Graphics Array
XFX - XFX Graphics, a Division of Pine
XMS - Extended Memory Specification
XT - Extended Technology
source:ရြာသားေလးစစ္စစ္
သိသင့္ေသာအတုိေကာက္မ်ားစြာ..
The first generation of analogue mobile phone technologies including AMPS, TACS and NMT
source:LuGyiMin
2G
The second generation of digital mobile phone technologies including GSM, CDMA IS-95 and D-AMPS IS-136
The second generation of digital mobile phone technologies including GSM, CDMA IS-95 and D-AMPS IS-136
2.5G
The enhancement of GSM which includes technologies such as GPRS
The enhancement of GSM which includes technologies such as GPRS
3G
The third generation of mobile phone technologies covered by the ITU IMT-2000 family
The third generation of mobile phone technologies covered by the ITU IMT-2000 family
3GPP
The 3rd Generation Partnership Project, a grouping of international standards bodies, operators and vendors with the responsibility of standardising the WCDMA based members of the IMT-2000 family
The 3rd Generation Partnership Project, a grouping of international standards bodies, operators and vendors with the responsibility of standardising the WCDMA based members of the IMT-2000 family
3GPP2
The counterpart of 3GPP with responsibility for standardising the CDMA2000-based members of the IMT-2000 family. 3GPP2 is spearheaded by ANSI
8PSK
Octantal Phase Shift Keying
A5/1/2/3/8X
Encryption algorithms for GSM networks
AAL
ATM Adaptation Layer
ABR
Available Bit Rate
A-bis
Interface between the BSC and BTS in a GSM network
AB
Access Burst; used for random access and characterised by a longer guard period to allow for burst transmission from a MS that does not know the correct timing advance when first contacting a network
ACTE
Approvals Committee for Terminal Equipment
ACTS
Advanced Communications Technologies and Services – a European technology initiative
ACU
Antenna Combining Unit
ADPCM
Adaptive Differential Pulse Code Modulation; a form of voice compression that typically uses 32kbit/s
AFC
Automatic Frequency Control
AGCH
Access Grant Channel; downlink only, BTS allocates a TCH or SDCCH to the MS, allowing it access to the network
Air interface
In a mobile phone network, the radio transmission path between the base station and the mobile terminal
A-interface
Interface between the MSC and BSS in a GSM network
AM
Amplitude Modulation
AMPS
Advanced Mobile Phone System, the analogue mobile phone technology used in North and South America and in around 35 other countries. Operates in the 800MHz band using FDMA technology
AMR
Adaptive Multi-Rate codec. Developed in 1999 for use in GSM networks, the AMR
has been adopted by 3GPP for 3G
Analogue
The representation of information by a continuously variable physical quantity such as voltage
ANSI
American National Standards Institute. An non-profit making US organisation which does not carry out standardisation work but reviews the work of standards bodies and assigns them category codes and numbers
ANSI-136
See D-AMPS
API
Application Program Interface
AoC
Advice of Charge
ARIB
Association of Radio Industries and Businesses. An organisation established by Japan’s Ministry of Posts and Communications to act as the standardisation authority for radio communication and broadcasting
ARPU
Average Revenue Per User
ASCII
American Standard Code for Information Interchange
ASIC
Application Specific Integrated Circuit
ASP
Application Service Provider
Asymmetric Transmission
Data transmissions where the traffic from the network to the subscriber is at a higher rate than the traffic from the subscriber to the network
A-TDMA
Advanced Time Division Multiple Access
ATM
Asynchronous Transfer Mode; a multiplexed information transfer and switching method in which the data is organised into fixed length 53-octet cells and transmitted according to each application’s instantaneous need
AUC
Authentication Centre; the element within a GSM network which generates the parameters for subscriber authentication
Bandwidth
A term meaning both the width of a transmission channel in terms of Hertz and the maximum transmission speed in bits per second that it will support
BCH
Broadcast Channels; carry only downlink information and are mainly responsible for synchronisation and frequency correction (BCCH, FCCH and SCH)
BCCH
Broadcast Control Channel; the logical channel used in cellular networks to broadcast signalling and control information to all mobile phones within the network
B-CDMA
Broadband Code Division Multiple Access
B-ISDN
Broadband ISDN
BER
Bit Error Rate; the percentage of received bits in error compared to the total number of bits received
BERT
Bit Error Rate Test
Bit
A bit is the smallest unit of information technology. As bits are made up using the binary number system, all multiples of bits must be powers of two i.e. a kilobit is actually 1024 bits and a megabit 1048576 bits. Transmission speeds are given in bits per second (bit/s)
Bluetooth
A low power, short range wireless technology designed to provide a replacement for the serial cable. Operating in the 2.4GHz ISM band, Bluetooth can connect a wide range of personal, professional and domestic devices such a laptop computers and mobile phones together wirelessly.
BHCA
Busy Hour Call Attempts; the number of call attempts made during a network’s busiest hour of the day
BSC
Base Station Controller; the network entity controlling a number of Base Transceiver Stations
BSS
Base Station System/Subsystem
BTS
Base Transceiver Station; the network entity which communicates with the mobile station
CAI
Common Air Interface; a standard developed for the UK’s public CT2 networks which enabled the same handset to be used on different networks
CAMEL
Customised Application for Mobile network Enhanced Logic; an IN feature in GSM networks that enables users to carry personal services with them when roaming into other networks that support CAMEL
CSE
CAMEL Service Environment
Capacity
A measure of a cellular network’s ability to support simultaneous calls
CB
Cell Broadcast
CC
Call Control; manages call connections
CCB
Customer Care and Billing
CCCH
Common Control Channels; a group of uplink and downlink channels between the MS and the BTS (see PCH, AGCH and RACH)
CCS7
Common Channel Signalling No. 7
CDMA
Code Division Multiple Access; also known as spread spectrum, CDMA cellular systems utilise a single frequency band for all traffic, differentiating the individual transmissions by assigning them unique codes before transmission. There are a number of variants of CDMA (see W-CDMA, B-CDMA, TD-SCDMA et al)
CDMAone
The first commercial CDMA cellular system; deployed in North America and Korea; also known as IS-95
CDMA2000
A member of the IMT-2000 3G family; backwardly compatible with cdmaOne
CDMA 1X
The first generation of cdma2000; the standardisation process indicated that there would be CDMA 2X and CDMA 3X but this no longer appears likely
CDMA 1X EV-DO
A variant of CDMA 1X which delivers data only
CDPD
Cellular Digital Packet Data; a packet switched data service largely deployed in the USA. The service uses idle analogue channels to carry the packetised information.
CDPSK
Coherent Differential Phase Shift Keying
CDR
Call Detail Records; the record made within the cellular network of all details of both incoming and outgoing calls made by subscribers, The CDR is passed to the billing system for action
Cell
The area covered by a cellular base station. A cell site may sectorise its antennas to service several cells from one locationCell site
The facility housing the transmitters/receivers, the antennas and associated equipment
Cell splitting
The process of converting a single cell to multiple cells by sectorising the antennas in the cell site or constructing additional cells within a cell site
CELP
Code Excited Linear Prediction; an analogue to digital voice coding scheme, there are a number of variants used in cellular systems
CEPT
Conference of European Posts and Telecommunications. A organisation of national posts, telegraphs and telephone administrations. Until 1988, when this work was take over by ETSI, the main European body for telecommunications standardisation. CEPT established the original GSM standardisation group
CF
Call Forwarding
CI
Carrier to Interference ratio
CIBER
Cellular Intercarrier Billing Exchange Roamer Record
CID
Caller Identification
Circuit switching
A method used in telecommunications where a temporary dedicated circuit of constant bandwidth is established between two distant endpoints in a network. Mainly used for voice traffic; the opposite of packet switching
CLID
Calling Line Identification
CLIP
Calling Line Identification Presentation
CLIR
Calling Line Identification Restriction
CM
Connection Management; is used to set up, maintain and take down call connections
CMOS
Complementary Metal Oxide Substrate
Codec
A word formed by combining coder and decoder the codec is a device which encodes and decodes signals. The voice codec in a cellular network converts voice signals into and back from bit strings. In GSM networks, in addition to the standard voice codec, it is possible to implement Half Rate (HR) codecs and Enhanced Full Rate (EFR) codecs
Control signal
A signal sent to a cellular phone from a base station or vice versa which carries information essential to the call but not including the audio portion of a conversation
CPE
Customer Premises Equipment; all the equipment on the end user’s side of the network interface
CPU
Central Processing Unit
PC တစ္လံုး တပ္ဆင္ရန္ ေရြးခ်ယ္ျခင္း (အပိုင္း-၁)
ဒီေဆာင္းပါးကို ျမန္မာႏိုင္ငံမွာ ပံုႏွိပ္ထုတ္ေ၀တဲ႔ Knowledge Bridge မဂၢဇင္း သို႔ စာမူပို႔ထားပါတယ္။ က်ေနာ္႔ဘေလာ႔မွာ ေရးသားေဖာ္ျပမယ္လို႔ ေျပာထားတဲ႔အတြက္ ဒီမွာအရင္ တင္လိုက္တာပါ။

PC ကြန္ပ်ဴတာ တစ္လံုးကို ေရြးခ်ယ္တပ္ဆင္ဖို႔အတြက္ အေၾကာင္း ႏွစ္ခ်က္အေပၚ မူတည္ စဥ္းစားပါတယ္။
၁။ ဘာအတြက္ သံုးစြဲမွာလဲ ? ၂။ ေငြဘယ္ေလာက္ အကုန္ခံမလဲ ?
မိမိအသံုးျပဳလိုတဲ႔ ကြန္ပ်ဴတာအမ်ိဳးအစားေပၚ မူတည္ၿပီး တပ္ဆင္မည္႔ Hardware ေတြကို ေရြးခ်ယ္ရတာျဖစ္ပါတယ္။ (ဥပမာ - ဗီဒီယို လုပ္ငန္းအတြက္ အသံုးျပဳမယ္ဆိုရင္ Graphic ပိုင္းကို ဦးစားေပးၿပီး၊ သူနဲ႔ လိုက္ဖက္မည္႔ RAM, CPU တို႔ကို ေရြးခ်ယ္ရပါတယ္။) တပ္ဆင္ထားတဲ႔ Hardware မ်ားက အသံုးျပဳမည္႔ Software မ်ားရဲ႕ လိုအပ္ခ်က္ထက္ သာလြန္ေနမွသာ အဆင္ေျပပါလိမ္႔မယ္။ Game တစ္ခု ေဆာ႔မယ္ ဆိုပါစို႔။ အဲဒီဂိမ္းအတြက္ 3.0GHz CPU, 2Gb RAM နဲ႔ 256Mb VGA တို႔ အနည္းဆံုး လိုအပ္တယ္လို႔ ေတာင္းဆိုခဲ႔ရင္ သူ႔ထက္ ပိုသာတဲ႔ Hardware မိမိမွာ ရိွထားမွသာ အသံုးျပဳရ အဆင္ေျပမွာပါ။ ဘာျဖစ္လို႔လဲဆိုေတာ႔ ဒီဂိမ္းကို ကစားေနစဥ္အတြင္းမွာ အျခား အသံုးျပဳမႈ အားလံုး ပိတ္ထားခဲ႔မယ္ဆိုရင္ေတာင္ OS တစ္ခုနဲ႔ Anti-Virus ကဲ႔သို႔ေသာ software မ်ားကို တစ္ၿပိဳင္တည္း အသံုးျပဳေနရဦးမွာ ျဖစ္လို႔ပါပဲ။ Hardware ကို တိုးျမွင္႔သံုးစြဲသည္ႏွင္႔အမွ် အသံုးျပဳရေသာ ေငြလည္း မ်ားျပားလာမွာပါ။ အဲဒီအတြက္ မိမိသံုးခ်င္သေလာက္နဲ႔ ေငြသံုးႏိုင္သေလာက္ကို မွ်တေအာင္ ခ်င္႔ခ်ိန္ ေရြးခ်ယ္ရမွာျဖစ္ပါတယ္။
CPU ေရြးခ်ယ္ျခင္း
ကြန္ပ်ဴတာ တစ္လံုးကို CPU မွ စတင္ၿပီး ေရြးခ်ယ္ၾကပါတယ္။ ေစ်းႏႈန္းအမ်ားဆံုး အစိတ္အပိုင္းျဖစ္ၿပီး သူ႔အေပၚမူတည္ကာ အျခားပစၥည္းမ်ားလည္း ေစ်းႏႈန္း လိုက္ျမင္႔သြားပါတယ္။ ကြန္ပ်ဴတာရဲ႕ အျမန္ႏႈန္းကလည္း သူ႔အေပၚမူတည္ကာ ကြာျခားသြားျခင္းေၾကာင္႔လည္း သူ႔ကို အဓိက စဥ္းစားပါတယ္။ ကြန္ပ်ဴတာရဲ႕ တြက္ခ်က္ပံု တစ္ခုလံုးနဲ႔ လုပ္ေဆာင္ႏိုင္မႈေတြကိုပါ ေျပာရမယ္ဆိုရင္ စာအုပ္တစ္အုပ္စာမက ျဖစ္သြားပါလိမ္႔မယ္။ က်ေနာ္ေရးသားခ်င္တာက တပ္ဆင္ႏိုင္ရန္ ေရြးခ်ယ္ျခင္းေလာက္ပဲ ျဖစ္လို႔ လိုအပ္တဲ႔ သေဘာတရားေလာက္ကိုပဲ တင္ျပသြားပါ႔မယ္။
မိမိ အသံုးျပဳမည္႔ Software က 3.0 GHz CPU ေလာက္ လိုအပ္မယ္ ဆိုရင္ေတာ႔ 2.0GHz ရိွတဲ႔ Core 2 CPU တစ္ခုကို အနည္းဆံုးအေနနဲ႔ ေေရြးခ်ယ္သင္႔ပါတယ္။ CPU ရဲ႕ လုပ္ေဆာင္ႏိုင္မႈကို speed ၂ မ်ိဳးနဲ႔ တြက္ခ်က္ သတ္မွတ္ပါတယ္။ CPU Clock Speed နဲ႔ FSB speed တို႔ ျဖစ္ၾကပါတယ္။ 2.0GHz ဆိုတဲ႕ Core 2 CPU ရဲ႕ speed က CPU clock speed (သို႔) processor speed ကို ရည္ညႊန္းျခင္းပဲ ျဖစ္ပါတယ္။ Core 2 ျဖစ္တဲ႔အတြက္ ေရတြက္ပံု ႏွစ္ဆ ျဖစ္ၿပီး ေရးသားထားတဲ႔ အျမန္ႏႈန္းရဲ႕ ႏွစ္ဆလို႔ ဆိုလိုပါတယ္။ (ဥပမာ - intel T4200 Duo Core 2.0 GHz ဆိုရင္ core ႏွစ္ခု မို႔လို႔ 4.0GHz ျဖစ္ပါတယ္) ။ CPU ဟာ ေစ်းအႀကီးဆံုး အစိတ္အပိုင္းျဖစ္ၿပီး၊ တပ္ဆင္မႈရဲ႕ အဓိက အစိတ္ပိုင္းလည္း ျဖစ္ပါတယ္။ လက္ရိွ Intel Core 2 Duo Processor တစ္ခုရဲ႕ တန္ဖိုးဟာ 150 $ ၀န္းက်င္မွာ ရိွပါတယ္။ သူနဲ႔လိုက္ဖက္ေအာင္ တပ္ဆင္မယ္ဆိုရင္ ခန္႔မွန္းေျခ သူ႔ရဲ႕ သံုးဆ ခန္႔ ကုန္က်ႏိုင္ပါတယ္။ (PC ပံုး တစ္ခုတည္းအတြက္ ခန္႔မွန္းေျချဖစ္ပါတယ္)။ ဘယ္ေလာက္ အကုန္ခံၿပီး ဘာကိုေရြးခ်ယ္ရမယ္ဆိုတာ အားလံုးဖတ္ၿပီးခ်ိန္မွာ စဥ္းစားႏိုင္မွာပါ။ က်ေနာ္ စာဆက္ေရးဖို႔ အဆင္ေျပရန္အတြက္ Intel® Core™2 Duo Processor E8200 ကို ဥပမာထား ေရြးခ်ယ္ၿပီး ေရးသြားပါ႔မယ္။
မိမိ စက္မွာ အသံုးျပဳမယ္႔ CPU ရဲ႕ အခ်က္အလက္ အေသးစိတ္ကို သိရဖို႔ သူ႔ရဲ႕ မူရင္း၀ဘ္ဆိုဒ္မွာ ရွာေဖြၾကည္႔ရွဴႏိုင္ပါတယ္။ (Intel CPU ကို အသံုးျပဳမယ္ဆိုရင္ www.intel.com ေပါ႔) ။ အခု ေရြးခ်ယ္ထားတဲ႔ E8200 ကုိ စံထားၿပီး အနည္းငယ္ ေရးသားသြားပါ႔မယ္။ E8200 ကို www.intel.com ရဲ႕ Search box မွာ ထည္႔ေရးၿပီး ရွာလိုက္ရင္ သူ႔ရဲ႕ အေသးစိတ္ အခ်က္အလက္ေတြကို ဇယားအေနနဲ႔ ျပမွာျဖစ္ပါတယ္။
အၾကမ္းဖ်င္း သိရမယ္႔ အခ်က္အလက္ကေတာ႔ -
CPU Clock speed (or) Processor Base Frequency - 2.66 GHz
FSB speed – 1333 MHz
# of Core – 2
L2 Cache – 6 Mb
Instruction Set – 64 bit
Max TDP - 65 W
Sockets Supported – LGA 775 တိို႔ျဖစ္ပါတယ္။
Clock speed မ်ားအေၾကာင္းကို ေသခ်ာရွင္းျပရင္ အရမ္း ရွည္လ်ားသြားမွာ ျဖစ္ပါတယ္။ အေသးစိတ္ သိခ်င္ရင္ A+ စာအုပ္ေတြမွာ ထပ္မံေလ႔လာၾကည္႔ပါ။ အခုက ေရြးခ်ယ္ တပ္ဆင္ႏိုင္ရံု အၾကမ္းဖ်င္း ေျပာခ်င္တာ ျဖစ္လို႔ နားလည္ရံုေလာက္ပဲ ေျပာပါ႔မယ္။ ကြန္ပ်ဴတာအစိတ္အပိုင္းေတြ တစ္ၿပိဳင္တည္း အလုပ္လုပ္ႏိုင္ရန္ signal clock မ်ားလိုအပ္ပါတယ္။ clock အႀကိမ္အေရအတြက္ မ်ားေလ ကြန္ပ်ဴတာ လုပ္ေဆာင္ႏႈန္း ျမန္ေလ ျဖစ္တဲ႔အတြက္ CPU clock speed ဟာလည္း ကြန္ပ်ဴတာ အျမန္ႏႈန္းအတြက္ တုိက္ရိုက္ပတ္သတ္ပါတယ္။ FSB speed ဆိုတာကေတာ႔ processor ႏွင္႔ motherboard ေပၚရိွ အစိတ္အပိုင္းတို႔ရဲ႕ အျပန္အလွန္ communicate လုပ္ႏိုင္ေသာ speed ပဲ ျဖစ္ပါတယ္။ Core ဆိုတဲ႔ data စီးဆင္းမႈက 2 (Duo) ျဖစ္တဲ႔အတြက္ CPU clock speed ႏွင္႔ FSB speed တို႔ကို ႏွစ္ဆ ျဖစ္ေစပါတယ္။ (Core™2 Quad ဆိုရင္ core – 4 ျဖစ္လို႔ ေရတြက္ပံုလည္း ေလးဆ ျဖစ္ပါတယ္)။
Cache မွာ L1 ႏွင္႔ L2 ဆိုၿပီး ရိွပါတယ္။ CPU cache မ်ားဟာ CPU ႏွင္႔ Main memory (RAM) တို႔ၾကားတြင္ ၾကားခံ Buffer အျဖစ္ ေဆာင္ရြတ္ပါတယ္။ ထပ္ခါ ထပ္ခါ လုပ္ေဆာင္ရေသာ လုပ္ငန္းမ်ား အတြက္ data ႏွင္႔ instruction မ်ားကို အသံုးျပဳမႈ အႀကိမ္အေရအတြက္ ေပၚမူတည္၍ သိမ္းဆည္းပါတယ္။ ေတာင္းဆိုလုိက္ေသာ data မ်ားကို ေဖာ္ျပရန္အတြက္ CPU သည္ cache ထဲတြင္ရွာေဖြပါတယ္။ မရိွမွသာ RAM ဆီမွ ေစာင္႔ဆိုင္းရပါတယ္။ Main memory (RAM) သည္ CPU ေလာက္ လွ်င္ျမန္စြာ လုပ္ေဆာင္ႏိုင္ျခင္း မရိွေသာေၾကာင္႔ ေစာင္႔ဆိုင္းခ်ိန္ (loading time) ရိွလာပါတယ္။ ထို႔ေၾကာင္႔ cache ပမာဏ မ်ားေလ ကြန္ပ်ဴတာ ရဲ႕ လုပ္ေဆာင္ခ်ိန္ ေစာင္႔ဆိုင္းရမႈ ကင္းေ၀းေေလ ပဲ ျဖစ္ပါတယ္။
Instruction Set – 64 bit ဆိုၿပီး အခုေရြးခ်ယ္ထားတဲ႔ CPU အတြက္ ေတြ႔ပါလိမ္႔မယ္။ 64 bit CPU မွသာလွ်င္ x64 bit OS ကို သံုးႏိုင္ပါလိမ္႔မယ္။
Max TDP ဆိုတာက CPU ရဲ႕ ပါ၀ါလိုအပ္တဲ႔ ပမာဏ ျဖစ္လို႔ Power supply ေရြးခ်ယ္မႈ အပိုင္းမွပဲ ဆက္ေျပာပါ႔မယ္။
Sockets – 775 ျဖစ္တဲ႔အတြက္ motherboard ကိုလည္း 775 sockets တပ္ဆင္ထားတဲ႔ board ကို ေရြးခ်ယ္ရမွာျဖစ္ပါတယ္။
၎ဇယားရဲ႕ေအာက္မွာလည္း တြဲဖက္ အသံုးျပဳႏိုင္တဲ႔ Chipset အမ်ိဳးအစားေတြ ျပထားပါတယ္။ ဒီ processor ကို သံုးမယ္ဆိုရင္ အဲဒီ chipset တစ္မ်ိဳးမ်ိဳး တပ္ဆင္ထားတဲ႔ Motherboard ကို ေရြးခ်ယ္ရမွာျဖစ္ပါတယ္။

Motherboard ေရြးခ်ယ္ျခင္း
Motherboard ေရြးခ်ယ္ဖို႔အတြက္ အဓိက ႏွစ္ခ်က္က မိမိအသံုးျပဳလိုတဲ႔ processor နဲ႔ ကိုက္ညီဖို႔နဲ႔ တပ္ဆင္လိုတဲ႔ casing အရြယ္အစားနဲ႔ အဆင္ေျပဖို႔ပဲ ျဖစ္ပါတယ္။ အခု က်ေနာ္ေရြးခ်ယ္ထားတဲ႔ processor နဲ႔ ကိုက္ညီတဲ႔ ASUS P5E64 WS EVOLUTION ကို ႏႈိုင္းယွဥ္ျပပါ႔မယ္။
၁။ sockets 775 ျဖစ္ၿပီး Core 2 Duo CPU ကို support လုပ္ပါတယ္။
၂။ FSB speed 1333 MHz ကို support လုပ္ပါတယ္။
၃။ Intel X48 chipset တပ္ဆင္ထားတဲ႔အတြက္ ေရြးခ်ယ္ထားတဲ႔ CPU နဲ႔ ကိုက္ညီပါတယ္။

ဒီသံုးခ်က္ ကိုက္ညီၿပီဆိုရင္ ေရြးခ်ယ္ထားတဲ႔ CPU နဲ႔ motherboard အဆင္ေျပသြားပါၿပီ။ က်န္တဲ႔ hardware ကိုေတာ႔ motherboard ေပၚမူတည္ၿပီး စဥ္းစားပါ႔မယ္။ ၎မွာ တပ္ဆင္ထားတဲ႔ slots မ်ားအလိုက္ RAM, VGA, Hard disk, Optical drive တို႔ကို ေရြးခ်ယ္ရမွာ ျဖစ္ပါတယ္။
Motherboard ရဲ႕ ေနာက္ထပ္ သတိျပဳစရာတစ္ခ်က္က အရြယ္အစားျဖစ္ပါတယ္။ mini casing သံုးလိုသူမ်ားအတြက္ motherboard အရြယ္အစားႀကီးတာကို ေရွာင္သင္႔ပါတယ္။ လက္ရိွ ေရြးခ်ယ္ထားတဲ႔ motherboard ကေတာ႔ Dimension: 12 inch x 9.6 inch ျဖစ္ပါတယ္။ ဒါကိုမွတ္ထားၿပီး casing ၀ယ္ရင္ ျပန္ၾကည္႔ရပါမယ္။

RAM ေရြးခ်ယ္ျခင္း
RAM (Random Access Memory) လို႔ေခၚတဲ႔ memory ဟာ ကြန္ပ်ဴတာ လုပ္ေဆာင္ရန္ လိုအပ္ေသာ instruction ႏွင္႔ data မ်ားကို ယာယီသိုေလွာင္ထားရန္ အသံုးျပဳျခင္းျဖစ္ပါတယ္။ volatile memory (ပါ၀ါ ေပးထားခ်ိန္တြင္သာ data မ်ားကို သိုမွီးထားႏိုင္ၿပီး၊ ပါ၀ါ ျဖတ္ေတာက္လိုက္သည္ႏွင္႔ အားလံုး ေပ်ာက္ပ်က္သြားေသာ memory) အမ်ိဳးအစားျဖစ္ပါတယ္။ RAM အမ်ိဳးအစား ေရြးခ်ယ္ရန္မွာ motherboard ေပၚမွ slots မ်ားေပၚ မူတည္ေသာေၾကာင္႔ motherboard ကို ျပန္ၾကည္႔ပါတယ္။ (website မ်ားမွ ၀ယ္ယူျခင္းမဟုတ္ပဲ show room မ်ားမွ တိုက္ရိုက္ ၀ယ္ယူပါက motherboard ဘူးထဲတြင္ပါေသာ လမ္းညႊန္စာအုပ္ကို ၾကည္႔ရွဴပါ။ )
က်ေနာ္ေရြးခ်ယ္ထားေသာ Asus board ကေတာ႔ RAM အတြက္ေအာက္ပါအတိုင္း ေျပာထားပါတယ္။
4 x DIMM, Max. 8 GB, DDR3 (1800)(1600)1333/1066/800 Dual Channel memory architecture
စံုတြဲလိုက္ စိုက္ရေသာ DIMM ႏွစ္ေခ်ာင္းတြဲ slots ေလးခု ပါၿပီး၊ အမ်ားဆံုး 8 Gb ထိ စိုက္ႏိုင္ပါတယ္။ DDR 3 အမ်ိဳးအစားကို ေရြးခ်ယ္ရမွာျဖစ္ၿပီး၊ ေဖာ္ျပထားတဲ႔ RAM speed ေတြထဲက တစ္မ်ိဳးမ်ိဳး ျဖစ္ရပါမယ္။ DIMM Dual Channel ေတြျဖစ္တဲ႔အတြက္ memory ႏွင္႔ speed တူညီေသာ RAM ႏွစ္ေခ်ာင္းကို ေရြးခ်ယ္သင္႔ပါတယ္။ (တစ္ေခ်ာင္းတည္း တပ္ဆင္အသံုးျပဳႏိုင္ေသာ္လည္း parallel အသံုးျပဳျခင္းက ေကာင္းပါတယ္။ ထို႔ေၾကာင္႔ 1Gb သာတပ္ဆင္လိုလွ်င္ 512 Mb ႏွစ္ေခ်ာင္းကို ေရြးခ်ယ္သင္႔ၿပီး၊ 2Gb အသံုးျပဳလိုပါက 1Gb ႏွစ္ေခ်ာင္း အသံုးျပဳျခင္းက ပိုသင္႔ေတာ္ပါတယ္)။ လက္ရိွေရြးခ်ယ္ထားတဲ႔ ပစၥည္းေတြအရ အနည္းဆံုး 2Gb ေတာ႔ တပ္ဆင္သင္႔ပါတယ္။ DIMM DDR3 (1066) 1024Mb Kingston ကို ေရြးခ်ယ္ၿပီး ႏွစ္ေခ်ာင္း ၀ယ္ယူပါမယ္။

Graphic Card ေရြးခ်ယ္ျခင္း
Video card (or) graphic card ကို ေမာ္နီတာေပၚမွာ ျမင္ေတြ႔ရေသာ ပံုရိပ္မ်ား ပံုေဖာ္ရန္အတြက္ အသံုးျပဳပါတယ္။ ယခု လက္ရိွ ထုတ္လုပ္အသံုးျပဳေနေသာ motherboard အေတာ္မ်ားမ်ားမွာ display adapter တစ္ခုအျဖစ္ သာမာန္ OS တစ္ခု အသံုးျပဳႏိုင္ရံုေတာ႔ ထည္႔သြင္းတည္ေဆာက္လာတာ ေတြ႔ရပါတယ္။ မည္သို႔ပင္ ျဖစ္ေစ graphic အသံုးျပဳမႈမ်ားေသာ windows Vista ႏွင္႔အထက္ OS မ်ားအတြက္ လည္းေကာင္း၊ Photoshop ႏွင္႔ Video Edition software မ်ားအတြက္ လည္းေကာင္း၊ Game မ်ားအတြက္လည္းေကာင္း လံုေလာက္မႈ မရိွပါ။ ထို႔အတြက္ သီးသန္႔ Graphic card တစ္ခုကို တပ္ဆင္ အသံုးျပဳရပါမယ္။ VGA card တစ္ခုရဲ႕ memory ဟာ RAM ရဲ႕ ေလးပံု တစ္ပံုခန္႔ ျဖစ္သင္႔ပါတယ္။ (ဥပမာ - RAM ကို 2Gb တပ္ဆင္မယ္ဆိုရင္ VGA ကို 512Mb ေရြးခ်ယ္ျခင္းဟာ အသင္႔ေတာ္ဆံုး ျဖစ္ပါတယ္)။
VGA အမ်ိဳးအစားေတြထဲမွာ PCI Express ကေတာ႔ ယေန႔ေနာက္ဆံုးေပၚ BUS တစ္မ်ိဳးပဲ ျဖစ္ပါတယ္။ PCI Express မွာ slot အမ်ိဳးအစား ေလးမ်ိဳးရိွပါတယ္။ မိမိ motherboard မွာ ရိွတဲ႔ slot နဲ႔ ကိုက္ညီတဲ႔ PCI Express တစ္ခုကိုေရြးခ်ယ္မွာ ျဖစ္ပါတယ္။ PIC Express 1X, 4X, 8X, 16X ဆိုၿပီး ေလးမ်ိဳးျဖစ္ပါတယ္။ ေအာက္ပါပံုမွာ သံုးမ်ိဳးျပထားပါတယ္။ 8X ကေတာ႔ 4X ႏွင္႔ 16X ၾကားထဲက အရြယ္အစားျဖစ္ပါတယ္။

မိမိေရြးခ်ယ္ထားတဲ႔ motherboard က ဘာ slots ကို အသံုးျပဳႏိုင္မလဲ ျပန္ၾကည္႔ၿပီး၊ အေပၚက ေျပာခဲ႔တဲ႔ memory ေရြးခ်ယ္မႈအတိုင္း ရွာေဖြၾကည္႔ပါ။ က်ေနာ္တုိ႔ ေရြးထားတဲ႔ Motherboard က PCIe x16 slot ေလးခု ပါၿပီး၊ PCIe x4 slot တစ္ခု ပါပါတယ္။ PCIe X16 ကို dual channel သံုးလို႔ ရေအာင္ စီစဥ္ေပးထားတဲ႔ အတြက္ VGA အရမ္းေကာင္းဖို႔ လိုအပ္တဲ႔ စက္အတြက္ အထူးသင္႔ေလွ်ာ္တဲ႔ motherboard ပါ။ အခုဆက္ေရးဖို႔အတြက္ ASUS EN GTS 250 OC ကိုေရြးခ်ယ္ပါတယ္။ nVidia 512Mb DDR3 ျဖစ္လို႔ က်ေနာ္တို႔ လိုခ်င္တဲ႔ memory ပမာဏ ကိုက္ညီၿပီး၊ PCIe 16X ျဖစ္လို႔ တပ္ဆင္ဖို႔လည္း ကိုက္ညီပါတယ္။

credit to : Knowledge Bridge Magazine
ဒုတိယပိုင္းအေနနဲ႔ Hard disk ေရြးခ်ယ္ျခင္း၊ Optical drive ေရြးခ်ယ္ျခင္းႏွင္႔ အျခားေသာ PC divice မ်ားေရြးခ်ယ္ရန္ အတြက္ ဆက္လက္ေရးသားလွ်က္ရိွပါတယ္။ အခုေရးထားၿပီးသေလာက္ တင္ေပးလိုက္တာပါ။ ေ၀ဖန္ဆန္းစစ္ေပးရင္း ....
ဒုတိယပိုင္းေမွ်ာ္ ..... :P
source:သံလံုငယ္
PC ကြန္ပ်ဴတာ တစ္လံုးကို ေရြးခ်ယ္တပ္ဆင္ဖို႔အတြက္ အေၾကာင္း ႏွစ္ခ်က္အေပၚ မူတည္ စဥ္းစားပါတယ္။
၁။ ဘာအတြက္ သံုးစြဲမွာလဲ ? ၂။ ေငြဘယ္ေလာက္ အကုန္ခံမလဲ ?
မိမိအသံုးျပဳလိုတဲ႔ ကြန္ပ်ဴတာအမ်ိဳးအစားေပၚ မူတည္ၿပီး တပ္ဆင္မည္႔ Hardware ေတြကို ေရြးခ်ယ္ရတာျဖစ္ပါတယ္။ (ဥပမာ - ဗီဒီယို လုပ္ငန္းအတြက္ အသံုးျပဳမယ္ဆိုရင္ Graphic ပိုင္းကို ဦးစားေပးၿပီး၊ သူနဲ႔ လိုက္ဖက္မည္႔ RAM, CPU တို႔ကို ေရြးခ်ယ္ရပါတယ္။) တပ္ဆင္ထားတဲ႔ Hardware မ်ားက အသံုးျပဳမည္႔ Software မ်ားရဲ႕ လိုအပ္ခ်က္ထက္ သာလြန္ေနမွသာ အဆင္ေျပပါလိမ္႔မယ္။ Game တစ္ခု ေဆာ႔မယ္ ဆိုပါစို႔။ အဲဒီဂိမ္းအတြက္ 3.0GHz CPU, 2Gb RAM နဲ႔ 256Mb VGA တို႔ အနည္းဆံုး လိုအပ္တယ္လို႔ ေတာင္းဆိုခဲ႔ရင္ သူ႔ထက္ ပိုသာတဲ႔ Hardware မိမိမွာ ရိွထားမွသာ အသံုးျပဳရ အဆင္ေျပမွာပါ။ ဘာျဖစ္လို႔လဲဆိုေတာ႔ ဒီဂိမ္းကို ကစားေနစဥ္အတြင္းမွာ အျခား အသံုးျပဳမႈ အားလံုး ပိတ္ထားခဲ႔မယ္ဆိုရင္ေတာင္ OS တစ္ခုနဲ႔ Anti-Virus ကဲ႔သို႔ေသာ software မ်ားကို တစ္ၿပိဳင္တည္း အသံုးျပဳေနရဦးမွာ ျဖစ္လို႔ပါပဲ။ Hardware ကို တိုးျမွင္႔သံုးစြဲသည္ႏွင္႔အမွ် အသံုးျပဳရေသာ ေငြလည္း မ်ားျပားလာမွာပါ။ အဲဒီအတြက္ မိမိသံုးခ်င္သေလာက္နဲ႔ ေငြသံုးႏိုင္သေလာက္ကို မွ်တေအာင္ ခ်င္႔ခ်ိန္ ေရြးခ်ယ္ရမွာျဖစ္ပါတယ္။
CPU ေရြးခ်ယ္ျခင္း
ကြန္ပ်ဴတာ တစ္လံုးကို CPU မွ စတင္ၿပီး ေရြးခ်ယ္ၾကပါတယ္။ ေစ်းႏႈန္းအမ်ားဆံုး အစိတ္အပိုင္းျဖစ္ၿပီး သူ႔အေပၚမူတည္ကာ အျခားပစၥည္းမ်ားလည္း ေစ်းႏႈန္း လိုက္ျမင္႔သြားပါတယ္။ ကြန္ပ်ဴတာရဲ႕ အျမန္ႏႈန္းကလည္း သူ႔အေပၚမူတည္ကာ ကြာျခားသြားျခင္းေၾကာင္႔လည္း သူ႔ကို အဓိက စဥ္းစားပါတယ္။ ကြန္ပ်ဴတာရဲ႕ တြက္ခ်က္ပံု တစ္ခုလံုးနဲ႔ လုပ္ေဆာင္ႏိုင္မႈေတြကိုပါ ေျပာရမယ္ဆိုရင္ စာအုပ္တစ္အုပ္စာမက ျဖစ္သြားပါလိမ္႔မယ္။ က်ေနာ္ေရးသားခ်င္တာက တပ္ဆင္ႏိုင္ရန္ ေရြးခ်ယ္ျခင္းေလာက္ပဲ ျဖစ္လို႔ လိုအပ္တဲ႔ သေဘာတရားေလာက္ကိုပဲ တင္ျပသြားပါ႔မယ္။
မိမိ အသံုးျပဳမည္႔ Software က 3.0 GHz CPU ေလာက္ လိုအပ္မယ္ ဆိုရင္ေတာ႔ 2.0GHz ရိွတဲ႔ Core 2 CPU တစ္ခုကို အနည္းဆံုးအေနနဲ႔ ေေရြးခ်ယ္သင္႔ပါတယ္။ CPU ရဲ႕ လုပ္ေဆာင္ႏိုင္မႈကို speed ၂ မ်ိဳးနဲ႔ တြက္ခ်က္ သတ္မွတ္ပါတယ္။ CPU Clock Speed နဲ႔ FSB speed တို႔ ျဖစ္ၾကပါတယ္။ 2.0GHz ဆိုတဲ႕ Core 2 CPU ရဲ႕ speed က CPU clock speed (သို႔) processor speed ကို ရည္ညႊန္းျခင္းပဲ ျဖစ္ပါတယ္။ Core 2 ျဖစ္တဲ႔အတြက္ ေရတြက္ပံု ႏွစ္ဆ ျဖစ္ၿပီး ေရးသားထားတဲ႔ အျမန္ႏႈန္းရဲ႕ ႏွစ္ဆလို႔ ဆိုလိုပါတယ္။ (ဥပမာ - intel T4200 Duo Core 2.0 GHz ဆိုရင္ core ႏွစ္ခု မို႔လို႔ 4.0GHz ျဖစ္ပါတယ္) ။ CPU ဟာ ေစ်းအႀကီးဆံုး အစိတ္အပိုင္းျဖစ္ၿပီး၊ တပ္ဆင္မႈရဲ႕ အဓိက အစိတ္ပိုင္းလည္း ျဖစ္ပါတယ္။ လက္ရိွ Intel Core 2 Duo Processor တစ္ခုရဲ႕ တန္ဖိုးဟာ 150 $ ၀န္းက်င္မွာ ရိွပါတယ္။ သူနဲ႔လိုက္ဖက္ေအာင္ တပ္ဆင္မယ္ဆိုရင္ ခန္႔မွန္းေျခ သူ႔ရဲ႕ သံုးဆ ခန္႔ ကုန္က်ႏိုင္ပါတယ္။ (PC ပံုး တစ္ခုတည္းအတြက္ ခန္႔မွန္းေျချဖစ္ပါတယ္)။ ဘယ္ေလာက္ အကုန္ခံၿပီး ဘာကိုေရြးခ်ယ္ရမယ္ဆိုတာ အားလံုးဖတ္ၿပီးခ်ိန္မွာ စဥ္းစားႏိုင္မွာပါ။ က်ေနာ္ စာဆက္ေရးဖို႔ အဆင္ေျပရန္အတြက္ Intel® Core™2 Duo Processor E8200 ကို ဥပမာထား ေရြးခ်ယ္ၿပီး ေရးသြားပါ႔မယ္။
မိမိ စက္မွာ အသံုးျပဳမယ္႔ CPU ရဲ႕ အခ်က္အလက္ အေသးစိတ္ကို သိရဖို႔ သူ႔ရဲ႕ မူရင္း၀ဘ္ဆိုဒ္မွာ ရွာေဖြၾကည္႔ရွဴႏိုင္ပါတယ္။ (Intel CPU ကို အသံုးျပဳမယ္ဆိုရင္ www.intel.com ေပါ႔) ။ အခု ေရြးခ်ယ္ထားတဲ႔ E8200 ကုိ စံထားၿပီး အနည္းငယ္ ေရးသားသြားပါ႔မယ္။ E8200 ကို www.intel.com ရဲ႕ Search box မွာ ထည္႔ေရးၿပီး ရွာလိုက္ရင္ သူ႔ရဲ႕ အေသးစိတ္ အခ်က္အလက္ေတြကို ဇယားအေနနဲ႔ ျပမွာျဖစ္ပါတယ္။
အၾကမ္းဖ်င္း သိရမယ္႔ အခ်က္အလက္ကေတာ႔ -
CPU Clock speed (or) Processor Base Frequency - 2.66 GHz
FSB speed – 1333 MHz
# of Core – 2
L2 Cache – 6 Mb
Instruction Set – 64 bit
Max TDP - 65 W
Sockets Supported – LGA 775 တိို႔ျဖစ္ပါတယ္။
Clock speed မ်ားအေၾကာင္းကို ေသခ်ာရွင္းျပရင္ အရမ္း ရွည္လ်ားသြားမွာ ျဖစ္ပါတယ္။ အေသးစိတ္ သိခ်င္ရင္ A+ စာအုပ္ေတြမွာ ထပ္မံေလ႔လာၾကည္႔ပါ။ အခုက ေရြးခ်ယ္ တပ္ဆင္ႏိုင္ရံု အၾကမ္းဖ်င္း ေျပာခ်င္တာ ျဖစ္လို႔ နားလည္ရံုေလာက္ပဲ ေျပာပါ႔မယ္။ ကြန္ပ်ဴတာအစိတ္အပိုင္းေတြ တစ္ၿပိဳင္တည္း အလုပ္လုပ္ႏိုင္ရန္ signal clock မ်ားလိုအပ္ပါတယ္။ clock အႀကိမ္အေရအတြက္ မ်ားေလ ကြန္ပ်ဴတာ လုပ္ေဆာင္ႏႈန္း ျမန္ေလ ျဖစ္တဲ႔အတြက္ CPU clock speed ဟာလည္း ကြန္ပ်ဴတာ အျမန္ႏႈန္းအတြက္ တုိက္ရိုက္ပတ္သတ္ပါတယ္။ FSB speed ဆိုတာကေတာ႔ processor ႏွင္႔ motherboard ေပၚရိွ အစိတ္အပိုင္းတို႔ရဲ႕ အျပန္အလွန္ communicate လုပ္ႏိုင္ေသာ speed ပဲ ျဖစ္ပါတယ္။ Core ဆိုတဲ႔ data စီးဆင္းမႈက 2 (Duo) ျဖစ္တဲ႔အတြက္ CPU clock speed ႏွင္႔ FSB speed တို႔ကို ႏွစ္ဆ ျဖစ္ေစပါတယ္။ (Core™2 Quad ဆိုရင္ core – 4 ျဖစ္လို႔ ေရတြက္ပံုလည္း ေလးဆ ျဖစ္ပါတယ္)။
Cache မွာ L1 ႏွင္႔ L2 ဆိုၿပီး ရိွပါတယ္။ CPU cache မ်ားဟာ CPU ႏွင္႔ Main memory (RAM) တို႔ၾကားတြင္ ၾကားခံ Buffer အျဖစ္ ေဆာင္ရြတ္ပါတယ္။ ထပ္ခါ ထပ္ခါ လုပ္ေဆာင္ရေသာ လုပ္ငန္းမ်ား အတြက္ data ႏွင္႔ instruction မ်ားကို အသံုးျပဳမႈ အႀကိမ္အေရအတြက္ ေပၚမူတည္၍ သိမ္းဆည္းပါတယ္။ ေတာင္းဆိုလုိက္ေသာ data မ်ားကို ေဖာ္ျပရန္အတြက္ CPU သည္ cache ထဲတြင္ရွာေဖြပါတယ္။ မရိွမွသာ RAM ဆီမွ ေစာင္႔ဆိုင္းရပါတယ္။ Main memory (RAM) သည္ CPU ေလာက္ လွ်င္ျမန္စြာ လုပ္ေဆာင္ႏိုင္ျခင္း မရိွေသာေၾကာင္႔ ေစာင္႔ဆိုင္းခ်ိန္ (loading time) ရိွလာပါတယ္။ ထို႔ေၾကာင္႔ cache ပမာဏ မ်ားေလ ကြန္ပ်ဴတာ ရဲ႕ လုပ္ေဆာင္ခ်ိန္ ေစာင္႔ဆိုင္းရမႈ ကင္းေ၀းေေလ ပဲ ျဖစ္ပါတယ္။
Instruction Set – 64 bit ဆိုၿပီး အခုေရြးခ်ယ္ထားတဲ႔ CPU အတြက္ ေတြ႔ပါလိမ္႔မယ္။ 64 bit CPU မွသာလွ်င္ x64 bit OS ကို သံုးႏိုင္ပါလိမ္႔မယ္။
Max TDP ဆိုတာက CPU ရဲ႕ ပါ၀ါလိုအပ္တဲ႔ ပမာဏ ျဖစ္လို႔ Power supply ေရြးခ်ယ္မႈ အပိုင္းမွပဲ ဆက္ေျပာပါ႔မယ္။
Sockets – 775 ျဖစ္တဲ႔အတြက္ motherboard ကိုလည္း 775 sockets တပ္ဆင္ထားတဲ႔ board ကို ေရြးခ်ယ္ရမွာျဖစ္ပါတယ္။
၎ဇယားရဲ႕ေအာက္မွာလည္း တြဲဖက္ အသံုးျပဳႏိုင္တဲ႔ Chipset အမ်ိဳးအစားေတြ ျပထားပါတယ္။ ဒီ processor ကို သံုးမယ္ဆိုရင္ အဲဒီ chipset တစ္မ်ိဳးမ်ိဳး တပ္ဆင္ထားတဲ႔ Motherboard ကို ေရြးခ်ယ္ရမွာျဖစ္ပါတယ္။
Motherboard ေရြးခ်ယ္ျခင္း
Motherboard ေရြးခ်ယ္ဖို႔အတြက္ အဓိက ႏွစ္ခ်က္က မိမိအသံုးျပဳလိုတဲ႔ processor နဲ႔ ကိုက္ညီဖို႔နဲ႔ တပ္ဆင္လိုတဲ႔ casing အရြယ္အစားနဲ႔ အဆင္ေျပဖို႔ပဲ ျဖစ္ပါတယ္။ အခု က်ေနာ္ေရြးခ်ယ္ထားတဲ႔ processor နဲ႔ ကိုက္ညီတဲ႔ ASUS P5E64 WS EVOLUTION ကို ႏႈိုင္းယွဥ္ျပပါ႔မယ္။
၁။ sockets 775 ျဖစ္ၿပီး Core 2 Duo CPU ကို support လုပ္ပါတယ္။
၂။ FSB speed 1333 MHz ကို support လုပ္ပါတယ္။
၃။ Intel X48 chipset တပ္ဆင္ထားတဲ႔အတြက္ ေရြးခ်ယ္ထားတဲ႔ CPU နဲ႔ ကိုက္ညီပါတယ္။
ဒီသံုးခ်က္ ကိုက္ညီၿပီဆိုရင္ ေရြးခ်ယ္ထားတဲ႔ CPU နဲ႔ motherboard အဆင္ေျပသြားပါၿပီ။ က်န္တဲ႔ hardware ကိုေတာ႔ motherboard ေပၚမူတည္ၿပီး စဥ္းစားပါ႔မယ္။ ၎မွာ တပ္ဆင္ထားတဲ႔ slots မ်ားအလိုက္ RAM, VGA, Hard disk, Optical drive တို႔ကို ေရြးခ်ယ္ရမွာ ျဖစ္ပါတယ္။
Motherboard ရဲ႕ ေနာက္ထပ္ သတိျပဳစရာတစ္ခ်က္က အရြယ္အစားျဖစ္ပါတယ္။ mini casing သံုးလိုသူမ်ားအတြက္ motherboard အရြယ္အစားႀကီးတာကို ေရွာင္သင္႔ပါတယ္။ လက္ရိွ ေရြးခ်ယ္ထားတဲ႔ motherboard ကေတာ႔ Dimension: 12 inch x 9.6 inch ျဖစ္ပါတယ္။ ဒါကိုမွတ္ထားၿပီး casing ၀ယ္ရင္ ျပန္ၾကည္႔ရပါမယ္။
RAM ေရြးခ်ယ္ျခင္း
RAM (Random Access Memory) လို႔ေခၚတဲ႔ memory ဟာ ကြန္ပ်ဴတာ လုပ္ေဆာင္ရန္ လိုအပ္ေသာ instruction ႏွင္႔ data မ်ားကို ယာယီသိုေလွာင္ထားရန္ အသံုးျပဳျခင္းျဖစ္ပါတယ္။ volatile memory (ပါ၀ါ ေပးထားခ်ိန္တြင္သာ data မ်ားကို သိုမွီးထားႏိုင္ၿပီး၊ ပါ၀ါ ျဖတ္ေတာက္လိုက္သည္ႏွင္႔ အားလံုး ေပ်ာက္ပ်က္သြားေသာ memory) အမ်ိဳးအစားျဖစ္ပါတယ္။ RAM အမ်ိဳးအစား ေရြးခ်ယ္ရန္မွာ motherboard ေပၚမွ slots မ်ားေပၚ မူတည္ေသာေၾကာင္႔ motherboard ကို ျပန္ၾကည္႔ပါတယ္။ (website မ်ားမွ ၀ယ္ယူျခင္းမဟုတ္ပဲ show room မ်ားမွ တိုက္ရိုက္ ၀ယ္ယူပါက motherboard ဘူးထဲတြင္ပါေသာ လမ္းညႊန္စာအုပ္ကို ၾကည္႔ရွဴပါ။ )
က်ေနာ္ေရြးခ်ယ္ထားေသာ Asus board ကေတာ႔ RAM အတြက္ေအာက္ပါအတိုင္း ေျပာထားပါတယ္။
4 x DIMM, Max. 8 GB, DDR3 (1800)(1600)1333/1066/800 Dual Channel memory architecture
စံုတြဲလိုက္ စိုက္ရေသာ DIMM ႏွစ္ေခ်ာင္းတြဲ slots ေလးခု ပါၿပီး၊ အမ်ားဆံုး 8 Gb ထိ စိုက္ႏိုင္ပါတယ္။ DDR 3 အမ်ိဳးအစားကို ေရြးခ်ယ္ရမွာျဖစ္ၿပီး၊ ေဖာ္ျပထားတဲ႔ RAM speed ေတြထဲက တစ္မ်ိဳးမ်ိဳး ျဖစ္ရပါမယ္။ DIMM Dual Channel ေတြျဖစ္တဲ႔အတြက္ memory ႏွင္႔ speed တူညီေသာ RAM ႏွစ္ေခ်ာင္းကို ေရြးခ်ယ္သင္႔ပါတယ္။ (တစ္ေခ်ာင္းတည္း တပ္ဆင္အသံုးျပဳႏိုင္ေသာ္လည္း parallel အသံုးျပဳျခင္းက ေကာင္းပါတယ္။ ထို႔ေၾကာင္႔ 1Gb သာတပ္ဆင္လိုလွ်င္ 512 Mb ႏွစ္ေခ်ာင္းကို ေရြးခ်ယ္သင္႔ၿပီး၊ 2Gb အသံုးျပဳလိုပါက 1Gb ႏွစ္ေခ်ာင္း အသံုးျပဳျခင္းက ပိုသင္႔ေတာ္ပါတယ္)။ လက္ရိွေရြးခ်ယ္ထားတဲ႔ ပစၥည္းေတြအရ အနည္းဆံုး 2Gb ေတာ႔ တပ္ဆင္သင္႔ပါတယ္။ DIMM DDR3 (1066) 1024Mb Kingston ကို ေရြးခ်ယ္ၿပီး ႏွစ္ေခ်ာင္း ၀ယ္ယူပါမယ္။
Graphic Card ေရြးခ်ယ္ျခင္း
Video card (or) graphic card ကို ေမာ္နီတာေပၚမွာ ျမင္ေတြ႔ရေသာ ပံုရိပ္မ်ား ပံုေဖာ္ရန္အတြက္ အသံုးျပဳပါတယ္။ ယခု လက္ရိွ ထုတ္လုပ္အသံုးျပဳေနေသာ motherboard အေတာ္မ်ားမ်ားမွာ display adapter တစ္ခုအျဖစ္ သာမာန္ OS တစ္ခု အသံုးျပဳႏိုင္ရံုေတာ႔ ထည္႔သြင္းတည္ေဆာက္လာတာ ေတြ႔ရပါတယ္။ မည္သို႔ပင္ ျဖစ္ေစ graphic အသံုးျပဳမႈမ်ားေသာ windows Vista ႏွင္႔အထက္ OS မ်ားအတြက္ လည္းေကာင္း၊ Photoshop ႏွင္႔ Video Edition software မ်ားအတြက္ လည္းေကာင္း၊ Game မ်ားအတြက္လည္းေကာင္း လံုေလာက္မႈ မရိွပါ။ ထို႔အတြက္ သီးသန္႔ Graphic card တစ္ခုကို တပ္ဆင္ အသံုးျပဳရပါမယ္။ VGA card တစ္ခုရဲ႕ memory ဟာ RAM ရဲ႕ ေလးပံု တစ္ပံုခန္႔ ျဖစ္သင္႔ပါတယ္။ (ဥပမာ - RAM ကို 2Gb တပ္ဆင္မယ္ဆိုရင္ VGA ကို 512Mb ေရြးခ်ယ္ျခင္းဟာ အသင္႔ေတာ္ဆံုး ျဖစ္ပါတယ္)။
VGA အမ်ိဳးအစားေတြထဲမွာ PCI Express ကေတာ႔ ယေန႔ေနာက္ဆံုးေပၚ BUS တစ္မ်ိဳးပဲ ျဖစ္ပါတယ္။ PCI Express မွာ slot အမ်ိဳးအစား ေလးမ်ိဳးရိွပါတယ္။ မိမိ motherboard မွာ ရိွတဲ႔ slot နဲ႔ ကိုက္ညီတဲ႔ PCI Express တစ္ခုကိုေရြးခ်ယ္မွာ ျဖစ္ပါတယ္။ PIC Express 1X, 4X, 8X, 16X ဆိုၿပီး ေလးမ်ိဳးျဖစ္ပါတယ္။ ေအာက္ပါပံုမွာ သံုးမ်ိဳးျပထားပါတယ္။ 8X ကေတာ႔ 4X ႏွင္႔ 16X ၾကားထဲက အရြယ္အစားျဖစ္ပါတယ္။
မိမိေရြးခ်ယ္ထားတဲ႔ motherboard က ဘာ slots ကို အသံုးျပဳႏိုင္မလဲ ျပန္ၾကည္႔ၿပီး၊ အေပၚက ေျပာခဲ႔တဲ႔ memory ေရြးခ်ယ္မႈအတိုင္း ရွာေဖြၾကည္႔ပါ။ က်ေနာ္တုိ႔ ေရြးထားတဲ႔ Motherboard က PCIe x16 slot ေလးခု ပါၿပီး၊ PCIe x4 slot တစ္ခု ပါပါတယ္။ PCIe X16 ကို dual channel သံုးလို႔ ရေအာင္ စီစဥ္ေပးထားတဲ႔ အတြက္ VGA အရမ္းေကာင္းဖို႔ လိုအပ္တဲ႔ စက္အတြက္ အထူးသင္႔ေလွ်ာ္တဲ႔ motherboard ပါ။ အခုဆက္ေရးဖို႔အတြက္ ASUS EN GTS 250 OC ကိုေရြးခ်ယ္ပါတယ္။ nVidia 512Mb DDR3 ျဖစ္လို႔ က်ေနာ္တို႔ လိုခ်င္တဲ႔ memory ပမာဏ ကိုက္ညီၿပီး၊ PCIe 16X ျဖစ္လို႔ တပ္ဆင္ဖို႔လည္း ကိုက္ညီပါတယ္။
credit to : Knowledge Bridge Magazine
ဒုတိယပိုင္းအေနနဲ႔ Hard disk ေရြးခ်ယ္ျခင္း၊ Optical drive ေရြးခ်ယ္ျခင္းႏွင္႔ အျခားေသာ PC divice မ်ားေရြးခ်ယ္ရန္ အတြက္ ဆက္လက္ေရးသားလွ်က္ရိွပါတယ္။ အခုေရးထားၿပီးသေလာက္ တင္ေပးလိုက္တာပါ။ ေ၀ဖန္ဆန္းစစ္ေပးရင္း ....
ဒုတိယပိုင္းေမွ်ာ္ ..... :P
source:သံလံုငယ္
ေက်ာ္ၾကမယ္ေဟ့ ခြၾကမယ္
 ကၽြန္ေတာ္တုိ႔ ေရႊျမန္မာျပည္ကေန youtube ဆုိက္ကုိ ၾကည့္ခြင့္မေပးထားပါဘူး . ပိတ္ထားပါတယ္ . မေန႔က ညီေလးတစ္ေယာက္ ျမန္မာျပည္ကေန youtube movies ေတြကုိ ဘယ္လုိၾကည့္ရင္ အဆင္အေျပဆုံး လဲလုိ႔ေမးလာပါတယ္ . freedom လဲမသုံးခ်င္ပါဘူးလုိ႔ ေျပာတယ္ . ကၽြန္ေတာ့္အေနနဲ႔ အခုေပးလုိက္တဲ့ ၀ဘ္ဆုိက္ကေလးကုိ သြားေစခ်င္ပါတယ္ . အဆင္ေျပမယ္လုိ႔လဲ ေမွ်ာ္လင့္ပါတယ္ . အခုေပးတဲ့ ဆုိက္ကုိေတာ့ ျမန္မာျပည္က ပိတ္မထားရေသးဘူးလုိ႔ သိရပါတယ္ .. Msn, AIM, Yahoo ႏွင့္ Gtalk တုိ႔ကုိလဲ အဆင္ေျပေျပပဲ ၀င္ Chat လုိ႔ရပါေသးတယ္ .. ကဲ စိတ္၀င္စားတယ္ဆုိရင္ ၀ဘ္ဆုိက္လိပ္စာနာမည္က https://polysolve.com ပါ .. အဆင္ေျပမယ္လုိ႔လဲေမွ်ာ္လင့္ပါတယ္ . ၿပီးေတာ့ အခုပုိ႔စ္ႏွင့္အတူ ေက်ာ္ဖုိ႔၊ ခြဖုိ႔အတြက္ ၀ဘ္ဆုိက္လိပ္စာေတြလဲ ေရးေပးလုိက္ပါတယ္ . သိသူမ်ားရွိသလုိ မသိသူမ်ားလဲရွိပါတယ္ . ေအာက္မွာ ယူလုိက္ပါ . ၀ဘ္ဆုိက္ အသစ္ေတြကုိပါ စာရင္းလုပ္ၿပီး ထည့္ေပးထားပါတယ္ .. Blog ေရးခ်င္သူမ်ားလဲ စမ္းသပ္လုိ႔ရမယ္ထင္ပါတယ္ . .
ေက်ာ္ခြလုိ႔ရသည့္ ၀ဘ္ဆုိက္မ်ားစာရင္း .
Vtunnel.com (Supports SSL)
Vtunnel.biz
Vtunnel.info
Vtunnel.us
Vtunnel.tv
V-tunnel.org (new)
Atunnel.com
Btunnel.com
Ctunnel.com
Dtunnel.com
Ftunnel.com
Gtunnel.com
G-tunnel.com (new)
H-tunnel.com (new)
I-tunnel.net (new)
Jtunnel.com
J-tunnel.com (new)
Ktunnel.com
K-tunnel.com (new)
Ltunnel.com
L-tunnel.com (new)
M-tunnel.com (new)
Ntunnel.com
N-tunnel.com (new)
Otunnel.com
O-tunnel.com (new)
Ptunnel.com
P-tunnel.com (new)
Q-tunnel.com (new)
Rtunnel.com
R-tunnel.com (new)
T-tunnel.net (new)
Wtunnel.com
Ztunnel.com
Ftunnel.net
Htunnel.net
Jtunnel.net
Ktunnel.net
Ltunnel.net
Ntunnel.net
Otunnel.net
Rtunnel.net
Wtunnel.net
W-tunnel.com (new)
Ztunnel.org
Unblock-Websense.com (new)
Unblock-Bess.com (new)
UnblockWebsense.com
UnblockBess.com
Polysolve.com
VPNTunnel.net
SafeForWork.net
VMathPie.com
USTunnel.com
USATunnel.com
BackFox.com
SafeHazard.com
SafeLizard.com
MathTunnel.com
NewBackDoor.com
GeoTunnel.com
EnglishTunnel.com
CalculatePie.com
DrProxy.net (new)
DrPruxy.net (new)
DrPxy.net (new)
FastFreeProxy.com (new)
ProxyGenie.com (new)
FreeToView.net (new)
PimpMyIP.com (new)
MyPrxy.com (new)
NinjaProxy.com (new)
AnonyNinja.com (new)
NinjaCover.com (new)
SamuraiProxy.com (new)
SamuraiStealth.com (new)
WarriorProxy.com (new)
24TopProxy.com (new)
SneakzorZ.com (new)
24Proxy.com
24Traffic.info
HideMyBox.com
ProxyButton.com
IraniProxy.com
WizProxy.com
DahProxy.com
FreeIam.info
g2gToMyspace.com
Geotunnel.com
Gotoproxy.com
ImSly.com
LogonHelp.org (new)
INeed-Myspace.com
ProxySense.com
SlyUser.com
Unlock-Myspace.com
Weprox.biz
Weprox.com
Weprox.info
Weprox.net
ေက်းဇူးတင္ပါတယ္ ...
source: ညီေနမင္း
Win Rar ႏွင့္ File ေတြဘယ္လုိ ခြဲထုတ္မလဲ
ဒီအေၾကာင္းကုိ အားလုံးသိမယ္ထင္ၿပီးေတာ့ မေရးတာပါ . အခု ေမးလာတဲ့သူရွိလုိ႔ ကၽြန္ေတာ္ ေရးေပးပါ့မယ္ .
အခုပထမဦးဆုံး win rar မရွိသူမ်ား ဒီမွာ သြားၿပီး Download လုပ္ယူႏုိင္ပါတယ္ဗ်ာ .. အရင္က ကၽြန္ေတာ္ တင္ထားေပးသားၿပီးသားပါ .
(1) Download လုပ္ၿပီးသြားတာနဲ႔ . ကုိခြဲခ်င္တဲ့ ဖုိင္ကုိ right click ေထာက္ၿပီး ပုံမွာျပထားသလုိ Add to archive ကုိေရြးလုိက္ပါ .
(၂) ကုိခြဲခ်င္တဲ့ file ပမာဏကုိ ပုံ(၂)မွာျပထားသလုိ ရုိက္ထည့္လုိက္ပါ ..
(၃) password ခံထားခ်င္ရင္ေတာ့ ပုံ(၃)မွာလုိ advanced >> set password ကုိႏွိပ္ၿပီး ကုိထားခ်င္တဲ့ password ကုိ ရုိက္ထည့္ေပးလုိက္ပါ .. ၿပီးရင္ ok ကုိႏွိပ္လုိက္ပါ
(၄) ၿပီးရင္ ပုံ(၄)မွာျပထားသလုိ သူဖုိင္ေတြကုိ စၿပီး ခြဲေနပါလိမ့္မယ္ .
(၅) ေနာက္ဆုံးေတာ့ ပုံ(၅)မွာလုိ ခြဲထားၿပီးသားဖုိင္ေတြကုိ ျမင္ေတြ႔ရမွာပါ ..
ပုံေလးေတြကုိ ကလစ္ႏွိပ္လုိက္ရင္ ပုံအႀကီးထြက္လာပါလိမ့္မယ္ .


ေက်းဇူးတင္ပါတယ္ ...
source:ညီေနမင္း
အခုပထမဦးဆုံး win rar မရွိသူမ်ား ဒီမွာ သြားၿပီး Download လုပ္ယူႏုိင္ပါတယ္ဗ်ာ .. အရင္က ကၽြန္ေတာ္ တင္ထားေပးသားၿပီးသားပါ .
(1) Download လုပ္ၿပီးသြားတာနဲ႔ . ကုိခြဲခ်င္တဲ့ ဖုိင္ကုိ right click ေထာက္ၿပီး ပုံမွာျပထားသလုိ Add to archive ကုိေရြးလုိက္ပါ .
(၂) ကုိခြဲခ်င္တဲ့ file ပမာဏကုိ ပုံ(၂)မွာျပထားသလုိ ရုိက္ထည့္လုိက္ပါ ..
(၃) password ခံထားခ်င္ရင္ေတာ့ ပုံ(၃)မွာလုိ advanced >> set password ကုိႏွိပ္ၿပီး ကုိထားခ်င္တဲ့ password ကုိ ရုိက္ထည့္ေပးလုိက္ပါ .. ၿပီးရင္ ok ကုိႏွိပ္လုိက္ပါ
(၄) ၿပီးရင္ ပုံ(၄)မွာျပထားသလုိ သူဖုိင္ေတြကုိ စၿပီး ခြဲေနပါလိမ့္မယ္ .
(၅) ေနာက္ဆုံးေတာ့ ပုံ(၅)မွာလုိ ခြဲထားၿပီးသားဖုိင္ေတြကုိ ျမင္ေတြ႔ရမွာပါ ..
ပုံေလးေတြကုိ ကလစ္ႏွိပ္လုိက္ရင္ ပုံအႀကီးထြက္လာပါလိမ့္မယ္ .
ေက်းဇူးတင္ပါတယ္ ...
source:ညီေနမင္း
NOKIA SECRET CODES
*#06# for checking the IMEI (International Mobile Equipment Identity).
*#7780# reset to factory settings.
*#67705646# This will clear the LCD display
*#0000# To view software version.
*#2820# Bluetooth device address.
*#746025625# Sim clock allowed status.
*#62209526# - Display the MAC address of the WLAN adapter. This is available only in the newer devices that supports WLAN like N80
#pw+1234567890+1# Shows if sim have restrictions.
*#92702689# - takes you to a secret menu where you may find some of the information below:
1. Displays Serial Number.
2. Displays the Month and Year of Manufacture
3. Displays (if there) the date where the phone was purchased (MMYY)
4. Displays the date of the last repair - if found (0000)
5. Shows life timer of phone (time passes since last start)
*#3370# - Enhanced Full Rate Codec (EFR) activation. Increase signal strength, better signal reception. It also help if u want to use GPRS and the service is not responding or too slow. Phone battery will drain faster though.
*#3370* - (EFR) deactivation. Phone will automatically restart. Increase battery life by 30% because phone receives less signal from network.
*#4720# - Half Rate Codec activation.
*#4720* - Half Rate Codec deactivation. The phone will automatically restart
If you forgot wallet code for Nokia S60 phone, use this code reset: *#7370925538#
Note, your data in the wallet will be erased. Phone will ask you the lock code. Default lock code is: 12345
Press *#3925538# to delete the contents and code of wallet.
*#7328748263373738# resets security code.
Default security code is 12345
Unlock service provider: Insert sim, turn phone on and press vol up(arrow keys) for 3 seconds, should say pin code. Press C,then press * message should flash, press * again and 04*pin*pin*pin#
Change closed caller group (settings >security settings>user groups) to 00000 and ure phone will sound the message tone when you are near a radar speed trap. Setting it to 500 will cause your phone 2 set off security alarms at shop exits, gr8 for practical jokes! (works with some of the Nokia phones.)
source: ညီေနမင္း
You might also like:
Saturday, August 13, 2011
Windows 7 မွာ Appearance Fonts ေျပာင္းနည္း
Windows 7 မွာ Appearance Fonts ကို zawgyi အျဖစ္ change ဖို႔နည္း လမ္းေလး ျဖစ္ပါတယ္။ Appearance Fonts ခ်ိန္းဖို႔ အတြက္ ေအာက္မွာ ေဖာ္ျပထားတဲ့ အဆင့္ေတြ အတိုင္း ျပဳလုပ္ပါ။
၁. Start မွ Search Box တြင္ run ကို႐ိုက္၍ Enter ေခါက္ပါ။
၂. Run Box တြင္ control desktop ဟု႐ိုက္၍ Enter ေခါက္ပါ။
၃. Personalization သို႔ ေရာက္ရွိမည္ျဖစ္ၿပီး ေအာက္ဘက္အလယ္ရွိ Windows Color ကို ႏွိပ္ပါ။
၄. Windows Color and Appearanceသို႔ ေရာက္ရွိမည္ျဖစ္ၿပီး ၄င္းမွ Advanced appearance settings .... ကိုႏွိပ္ပါ။
၅. Windows Color and Appearance Box မွ Item တြင္ ေအာက္ပါအတိုင္း မိမိေျပာင္းလိုသည္ မ်ားကို ေရြး ခ်ယ္၍ Font တြင္ ZawgyiOne ကို ေရြးခ်ယ္ပါ။
-Folder ႏွင့္ File မ်ားကို ျမန္မာလိုေပၚလိုပါက Icon ကိုေရြးပါ။
-Menu မ်ားကို ျမန္မာလိုေပၚလိုပါက Menu ကိုေရြးပါ။ အေကာင္းဆံုးျပဳလုပ္ႏို္င္ၾကပါေစေနာ္။
Start Menu မွာ Run Box ေပၚေအာင္လုပ္မယ္
ကြ်န္ေတာ္တို႔ Windows 7 အသံုးျပဳသူေတြက Run ေဘာက္စ္ကိုေခၚ ခ်င္ရင္ win + r (ဝင္းဒိုးကီးနဲ႔ r )တြဲႏွိပ္မွ run ေဘာက္ေလး ထြက္လာပါတယ္။ တစ္ခါတေလမွာ အဆင္ေျပေပမယ့္ တစ္ခါတေလေတာ့ Start menu ထဲက Run Box ကို တမ္းတမိတာပါပဲ။ ကြ်န္ေတာ္ အပါအဝင္ေပါ့။ ခုကြ်န္ေတာ္ ေျပာျပမယ့္ ဟာေလးကေတာ့ Windows 7 မွာ start menu ထဲမွာ Run box ေလးေပၚေအာင္ လုပ္တာေလးပါ။
၁။ Start menu ေပၚမွာ right click ေခါက္ၿပီး Properties ကိုေရြးပါ။
၂။ ေဘာက္စ္တစ္ခုက်လာတဲ့အခါမွာ start menu tab ေအာက္မွာရွိတဲ့ customize ဆိုတဲ့ button ေလးကိုကလစ္ႏွိပ္ပါ။
၃။ ေဘာက္စ္တစ္ခု ထပ္က်လာပါလိမ့္မယ္။အဲဒီထဲကမွ run command ဆိုတဲ့ ခ်က္ေဘာက္စ္ကေလးကို အြန္ေပး လိုက္ပါ။
၄။ ၿပီးရင္ေတာ့ OK ကိုကလစ္ပါ။ အားလံုးၿပီးသြားၿပီဆိုရင္ေတာ့ start menu မွာ Run ဆိုတာေလး ကို ေတြ႕ရ ၿပီျဖစ္ပါတယ္။
ကြန္ပ်ဴတာကို ျမန္ဆန္ေစမယ့္ နည္းလမ္း (၅) မ်ိဳး
ကိုယ့္ရဲ႕ကြန္ပ်ဴတာ ပိတ္ခါနီးပဲျဖစ္ျဖစ္ ဖြင့္ခါစပဲ ျဖစ္ျဖစ္ ကြန္ပ်ဴတာ ေပါ႔ေပါ႔ေလးျဖစ္ေအာင္ အမိႈက္ေတြကို ရွင္းလင္းမယ့္ နည္း (၅) နည္းကို ေျပာျပပါမယ္။ သိၿပီးတဲ့ လူေတြ အတြက္ေတာ့ မလိုဘူးေပါ႔ဗ်ာ။ မသိေသးတဲ့ လူေတြ အတြက္ေတာ့ အတိုင္းအတာ တစ္ခုေလာက္ထိ အက်ိဳးရွိမွာပါ။ ပထမဆံုး start ေအာက္ကေန run box ကို ဖြင့္လိုက္ပါ။ (Window + R) နဲ႔ တြဲဖြင့္ရင္လည္း ရပါတယ္။ အဲဒီ Run Box မွာပဲ
၁။ temp ႐ိုက္ Select All (Ctrl + A ) လုပ္ (Shift + Delete) နဲ႔ ဖ်က္ပစ္လိုက္။ ၿပီးရင္
၂။ %temp% ႐ိုက္ Select All (Ctrl + A) လုပ္ ( Shift + Delete) နဲ႔ ဖ်က္ပစ္လိုက္။ ၿပီးရင္
၃။ prefetch ႐ိုက္ Select All (Ctrl + A) လုပ္ ( Shift + Delete) နဲ႔ ဖ်က္ပစ္လိုက္။ ၿပီးရင္
၄။ recent ႐ိုက္ Select All (Ctrl + A) လုပ္ (Shift + Delete) နဲ႔ ဖ်က္ပစ္လိုက္။ ၿပီးရင္
၅။ cookies ႐ိုက္ Select All (Ctrl + A) လုပ္ (Shift + Delete) နဲ႔ ဖ်က္ပစ္လိုက္။ သင့္ကြန္ပ်ဴတာ ပံုမွန္ထက္ ပိုမိုေကာင္းမြန္တာကို ေတြ႕ရ ပါလိမ့္မယ္။ အဆင္ေျပၾကပါေစ။
Sunday, July 24, 2011
မိမိစက္ Restart ခဏခဏက်တာ ဘာေၾကာင္႕လဲ?
မိမိစက္ Restart ခဏခဏက်တာ ဘာေၾကာင္႕လဲ?
1.heat မ်ားေနျခင္း ။ ။ မိမိတုိ႕ စက္သုံးတာ ၾကာလာရင္ Processor heat မ်ားတာတုိ႕ ျဖစ္တက္ပါတယ္။ အဲဒီလုိ Heat မ်ားလာေတာ႕ Processor မွာကပ္ထားတဲ႔ ေကာ္ေဖာ္ၾကြလာတာလဲ ျဖစ္တက္ပါတယ္။ ဒါေၾကာင္႕ မိမိ စက္ရဲ႕ Heat ကုိ စစ္ေဆးသင္႕ပါတယ္။ ေနာက္တစ္ခုကေတာ႕ Cooling Fun ေတြေကာင္းမေကာင္းစစ္ေဆးသင္႕ပါတယ္။
2.ေနာက္ျဖစ္ႏုိင္ေျခကေတာ႕ ကၽြန္ေတာ္တုိ႕ Virtual Memory နည္းလာတဲ႕အခါ handing ျဖစ္လာမယ္.ျပီရင္ Processor ရဲ႕ Speed ကုိထုိးက်သြားတက္ပါတယ္။
3.ေနာက္တစ္ခ်က္ ျဖစ္ႏုိင္ေသးတာကေတာ႕ မိမိစက္ကုိ သန္႕ရွင္းေရးလုပ္ေပးလုိက္ပါ။ Hardware ေတြကုိသန္႕ရွင္းေရး လုပ္ေဆာင္သင္႕သလုိ မိမိတုိ႕ စက္ထဲမွ မလုိအပ္တဲ႕ Service ေတြကုိ သန္႕ရွင္းေရးလုပ္ေဆာင္ပါ။ (%tem%,prefetch,recent...........)
4.ေနာက္တစ္ခုလုပ္သင္႕တာက Hard Disk ကုိ Error check လုပ္ေဆာင္ေပးပါ။
5.ေနာက္လုပ္သင္႕တာကေတာ႕ မိမိစက္ကုိ ေလ၀င္ေလထြက္ေကာင္းတဲ႕ေနရာမွာ ထားသင္႔ပါတယ္။
6.ေနာက္ျဖစ္ႏုိင္တာကေတာ Virus ေၾကာင္႕လဲျဖစ္ႏုိင္ပါတယ္။ ဒါေၾကာင္႕ မိမိ Anti-Virus ကုိ စစ္ေဆးသင္႕ပါတယ္။ up to date ျဖစ္မျဖစ္။
7.ေနာက္တစ္ခု တစ္ခါတစ္ေလ Software ေတြညီွတာလည္ ျဖစ္ႏုိင္ပါတယ္။ System Restore ျပန္ေခၚၾကည္႕ပါ။
8.မရတဲ႕အဆုံး Windows ျပန္တင္ၾကည္႕လုိက္ပါ။
9.တစ္ခ်ဳိ႕က ေျပာက်တယ္။ Hard Disk ေၾကာင္႕လုိ႔။ Hard Disk နဲ႕ မဆုိင္ပါဘူး။ အမ်ားဆုံးျဖစ္ႏုိင္တာက Heat ႏွင္႕ Virus ေၾကာင္႕တာ အျဖစ္မ်ားပါတယ္။ ေက်းဇူးတင္ပါတယ္ (ကၽြန္ေတာ္သိသေလာက္သာ တင္ျပခ်င္ျဖစ္ပါတယ္)
10.BISO ျပႆနာလည္ျဖစ္ႏုိင္ပါတယ္။ ေနာက္ ကၽြန္ေတာ္သူငယ္ခ်င္းဆုိဒ္မွာ တင္ထားတဲ႕နည္းေလးကုိ တင္ျပေပးလုိက္ပါတယ္။ သူငယ္ခ်င္း ခ်စ္တီး
 ေက်းဇူးတင္ရွိပါတယ္။
Auto Cad အေၿခခံေလးေတြဆြဲၾကေအာင္
Auto Cad အေၿခခံေလးေတြဆြဲၾကေအာင္
ကြ်န္ေတာ္ကေတာ့ Auto Cad 2007 ေလးတင္ထားပါတယ္။ 2007 ေလးနဲ ့ပဲဆြဲၾကည့္ၾကတာေပါ့ဗ်ာ။ ကြ်န္ေတာ္လဲ ၀ါသနာပါလို့ဆြဲၾကည့္တာပါ။ Auto Cad ကိုအခုမွစသံုးမယ့္သူငယ္ခ်င္းေတြအတြက္ပါ..ပံုဆြဲရန္အလြယ္တကူၿဖစ္ေစမည့္
tools ေလးေတြ ကိုအရင္ေဖာ္ပါ့မယ္။ Auto Cad screen ေပၚကလြက္တဲ့တစ္ေနရာမွာ right cilck နွိပ္ၿပီး ACAD ကိုသြားၿပီးမိမိဆြဲရန္လြယ္ကူမည့္ tools ေလးေတြကိုထည့္ပါ။
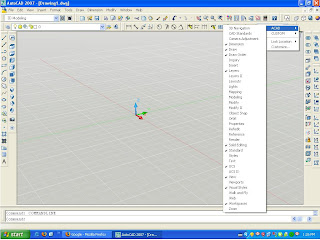
စတုဂံပံုေလးကိုဆြဲၿပီးေဖာက္ၾကည့္ၾကရေအာင္ဗ်ာ ပထမအဆင့္အေနနဲ့ draw ထဲက rectangle ေလးကိုနွိက္လိုက္ပါ။
commond မွာ @10,10 လို ့ရိုက္ထဲ့လိုက္ပါ ၿပီးလွ်င္ enter ေခါက္ေအာက္ပါပံုေလးအတိုင္းရပါလိမ့္မယ္။
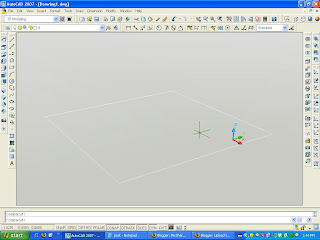
အဲ့ဒီ 10 ပက္လည္ရွိတဲ့စတုဂံေလးအတြင္းကေန 9 ပက္လည္ရွိတဲ့ စတုဂံေလး ထက္ဆြဲပါမယ္။ အထက္ပါနည္းအတိုင္း
draw ထဲက rectangle ေလးကို ႏွိပ္လိုက္ပါ @9,9 ရိုက္ၿပီး enter ေခါက္ပါ။ဒါကေတာ့ေနာက္တစ္နည္းေပါ့ဗ်ာ။
offset လို ့ရိုက္ၿပီး enter ေခါက္လိုက္ပါ select object လုပ္လုိက္ၿပီး mouse direction ကို မိမိလိုခ်င္တဲ့
ဘက္ကိုထားပါ။ (အၿပင္ သို ့မဟုက္ အတြင္းကိုေပါ့) အခုက်ြန္ေတာ္တို ့က 9 ပက္လည္ရွိတဲ့စတုဂံေလးလိုခ်င္လို ့1 လို ့
ရိုက္ၿပီး enter ေခါက္ပါ ေအာက္ပါပံုေလးအတိုင္းရပါ့မယ္။
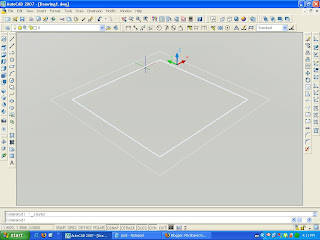
ကဲဒီတစ္ခါကြ်န္ေတာ္တို့ဆြဲထားတဲ့စတုဂံပံုေလးေတြကို ထုတင္ၾကမယ္ဗ်ာ။ ပထမဆံုး ext လို့ရိုက္ထဲ့လိုက္ပါ select
object ေတာင္းရင္အၿပင္ကစတုဂံေလးကို select ေပးၿပီး 10 လို ့ရိုက္ထဲ့လိုက္ပါေအာက္ပါပံုေလးအတိုင္း ထြက္လာ
ပါ့မယ္။
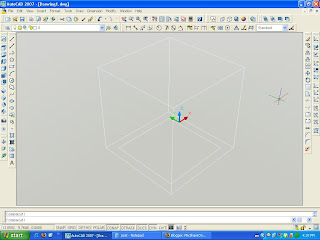
အၿပင္ကစတုဂံေလးၿပီးသြားတဲ့အခ်ိန္မွာ အထဲကစတုဂံေလးကိုထက္ၿပီးထုတင္ပါ့မယ္..ထံုးစံတိုင္းေပါ့ ext ၿပီးရင္ select
object အတြင္းကစတုဂံေလးကိုေပးပါ။ဒီတစ္ခါေတာ့ select ေပးၿပီးရင္ 9 လို့ရိုက္ထဲ့ပါ ။ေအာက္ပါပံုေလးထြက္လာပါ့မယ္။
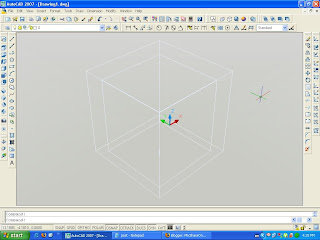
အေပၚကလုပ္ၿပီးတဲ့ စတုဂံေလးနွစ္ခုကိုနွုက္ေပးပါ့မယ္ဗ်ာ။ ဘယ္လိုနွုက္မလဲဆိုေတာ ့အၿပင္စတုဂံေလးထဲကေန အတြင္းက
စတုဂံေလးကိုနွုက္မွာပါ။ သို ့ၿဖစ္ပါေသာေၾကာင့္ su ဆိုတဲ့ commond ေလးရိုက္ထဲ့လိုက္ပါ select object ေတာင္းရင္ အၿပင္ကစတုဂံေလးကို click လိုက္ပါ။ ၿပီးရင္အလြက္ တစ္ေနရာမွာ right click လုပ္ပါ။ ဆက္လက္ၿပီး အတြင္းက စတုဂံ
ေလးကို click လိုက္ပါ အလြက္တစ္ေနရာမွာ right click လိုက္ပါ...ေအာက္ကပံုေလးအတိုင္းလုပ္ပါ...မွ်ားအေသး
ပထမ click မွ်ားအၾကီးဒုတိယ click...
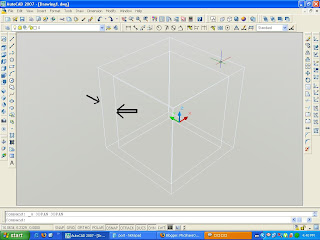
ၿပီးလွ်ာင္ေအာက္ကပံုေလးအတိုင္း view ထဲကို၀င္ၿပီးေၿပာင္းေပးပါဦး
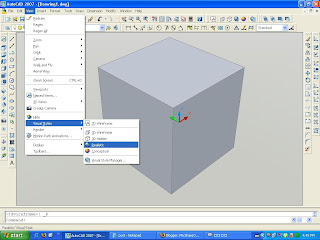
အေပၚမွာေမ့ေနခဲ့လို့ဗ်ာ tools ေလးေတြထဲက orbit ေလးကိုၿပန္ေဖာ္ပါဦး။ကြ်န္ေတာ္တို့လုပ္ထားတဲ့ စတုဂံေလးကို လွည့္ပက္ၾကည့္ရေအာင္လို့ပါ။ ေအာက္ကပံုေလးအတိုင္းေပါ့။
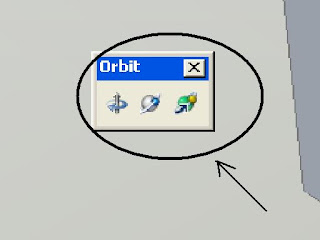
ကဲစိက္ၾကိဳက္လွည့္ၾကေတာ့ဗ်ာ။ ပံုေတြေတာ့ေတာ္ေတာ္မ်ားသြားတယ္ဗ်ာ။ ေနာက္ပံုေတြလဲအမ်ားၾကီး တင္ခ်င္ပါ
ေသးတယ္ဗ်ာ..ေနာက္မ်ားမွာေတြ ့ၾကတာေပါ့။
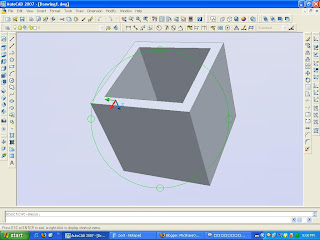
ပံုဆြဲရာတြင္အခက္အခဲရွိပါက chitkoko48@gmail.com သို ့ဆက္သြယ္နိုင္ပါသည္။ သိတာေလးေတြေတာ့ေၿပာၿပ
နိုင္ပါသည္။ ေပ်ာ္ရႊင္ၾကပါေစ။
ခ်စ္ကိုကို

စတုဂံပံုေလးကိုဆြဲၿပီးေဖာက္ၾကည့္ၾကရေအာင္ဗ်ာ ပထမအဆင့္အေနနဲ့ draw ထဲက rectangle ေလးကိုနွိက္လိုက္ပါ။
commond မွာ @10,10 လို ့ရိုက္ထဲ့လိုက္ပါ ၿပီးလွ်င္ enter ေခါက္ေအာက္ပါပံုေလးအတိုင္းရပါလိမ့္မယ္။

အဲ့ဒီ 10 ပက္လည္ရွိတဲ့စတုဂံေလးအတြင္းကေန 9 ပက္လည္ရွိတဲ့ စတုဂံေလး ထက္ဆြဲပါမယ္။ အထက္ပါနည္းအတိုင္း
draw ထဲက rectangle ေလးကို ႏွိပ္လိုက္ပါ @9,9 ရိုက္ၿပီး enter ေခါက္ပါ။ဒါကေတာ့ေနာက္တစ္နည္းေပါ့ဗ်ာ။
offset လို ့ရိုက္ၿပီး enter ေခါက္လိုက္ပါ select object လုပ္လုိက္ၿပီး mouse direction ကို မိမိလိုခ်င္တဲ့
ဘက္ကိုထားပါ။ (အၿပင္ သို ့မဟုက္ အတြင္းကိုေပါ့) အခုက်ြန္ေတာ္တို ့က 9 ပက္လည္ရွိတဲ့စတုဂံေလးလိုခ်င္လို ့1 လို ့
ရိုက္ၿပီး enter ေခါက္ပါ ေအာက္ပါပံုေလးအတိုင္းရပါ့မယ္။

ကဲဒီတစ္ခါကြ်န္ေတာ္တို့ဆြဲထားတဲ့စတုဂံပံုေလးေတြကို ထုတင္ၾကမယ္ဗ်ာ။ ပထမဆံုး ext လို့ရိုက္ထဲ့လိုက္ပါ select
object ေတာင္းရင္အၿပင္ကစတုဂံေလးကို select ေပးၿပီး 10 လို ့ရိုက္ထဲ့လိုက္ပါေအာက္ပါပံုေလးအတိုင္း ထြက္လာ
ပါ့မယ္။

အၿပင္ကစတုဂံေလးၿပီးသြားတဲ့အခ်ိန္မွာ အထဲကစတုဂံေလးကိုထက္ၿပီးထုတင္ပါ့မယ္..ထံုးစံတိုင္းေပါ့ ext ၿပီးရင္ select
object အတြင္းကစတုဂံေလးကိုေပးပါ။ဒီတစ္ခါေတာ့ select ေပးၿပီးရင္ 9 လို့ရိုက္ထဲ့ပါ ။ေအာက္ပါပံုေလးထြက္လာပါ့မယ္။

အေပၚကလုပ္ၿပီးတဲ့ စတုဂံေလးနွစ္ခုကိုနွုက္ေပးပါ့မယ္ဗ်ာ။ ဘယ္လိုနွုက္မလဲဆိုေတာ ့အၿပင္စတုဂံေလးထဲကေန အတြင္းက
စတုဂံေလးကိုနွုက္မွာပါ။ သို ့ၿဖစ္ပါေသာေၾကာင့္ su ဆိုတဲ့ commond ေလးရိုက္ထဲ့လိုက္ပါ select object ေတာင္းရင္ အၿပင္ကစတုဂံေလးကို click လိုက္ပါ။ ၿပီးရင္အလြက္ တစ္ေနရာမွာ right click လုပ္ပါ။ ဆက္လက္ၿပီး အတြင္းက စတုဂံ
ေလးကို click လိုက္ပါ အလြက္တစ္ေနရာမွာ right click လိုက္ပါ...ေအာက္ကပံုေလးအတိုင္းလုပ္ပါ...မွ်ားအေသး
ပထမ click မွ်ားအၾကီးဒုတိယ click...

ၿပီးလွ်ာင္ေအာက္ကပံုေလးအတိုင္း view ထဲကို၀င္ၿပီးေၿပာင္းေပးပါဦး

အေပၚမွာေမ့ေနခဲ့လို့ဗ်ာ tools ေလးေတြထဲက orbit ေလးကိုၿပန္ေဖာ္ပါဦး။ကြ်န္ေတာ္တို့လုပ္ထားတဲ့ စတုဂံေလးကို လွည့္ပက္ၾကည့္ရေအာင္လို့ပါ။ ေအာက္ကပံုေလးအတိုင္းေပါ့။

ကဲစိက္ၾကိဳက္လွည့္ၾကေတာ့ဗ်ာ။
ပံုေတြေတာ့ေတာ္ေတာ္မ်ားသြားတယ္ဗ်ာ။ ေနာက္ပံုေတြလဲအမ်ားၾကီး တင္ခ်င္ပါေသးတယ္ဗ်ာ..ေနာက္မ်ားမွာေတြ ့ၾကတာေပါ့။

ပံုဆြဲရာတြင္အခက္အခဲရွိပါက chitkoko48@gmail.com သို ့ဆက္သြယ္နိုင္ပါသည္။ သိတာေလးေတြေတာ့ေၿပာၿပ
နိုင္ပါသည္။
ေပ်ာ္ရႊင္ၾကပါေစ။ခ်စ္ကိုကို
Run အက်ိဳးရွိပံု ႏွင့္ Commands
Showing newest posts with label XP. Show older posts
Tuesday, May 24, 2011
Run အက်ိဳးရွိပံု ႏွင့္ Commands
Run ဆိုတဲ့ အဓါပၸယ္နဲ ့အညီသူက ေျပးတာပါ.ဆိုလိုတဲ့သေဘာကေတာ့ ရန္ကုန္ကေန ခ်င္းျပည္နယ္သြားမယ္ဆိုပါစို ့ ဒီအတိုင္းသြားမယ္ဆိုလွ်င္ ကား၊ရထားတဆင့္ျပီးတဆင့္ေပါ့ ဒါေပမဲ့ Run မွာဆိုရင္ေတာ့ တခါတည္းနဲ ့မပန္းပမ္းဘဲေရာက္မယ္ေလဆိုေတာ႔ Run ကအသံုး၀င္တာေပါ့ဒီမ်ိဳးဘဲ ကြန္ပ်ဳတာမွာဆို Microsoft word ကိုဖြင့္မယ္ဆိုပါစို ့ Start-programs-Microsoft Office-Win word ေပါ့ဒီလိုဆိုအဆင့္ကလဲမ်ားတာေပါ့ဒါေပမဲ့ Run မွာက်ေတာ့ logo+R ကိုႏွိပ္ျပီး Win word ကိုဖြင့္မယ္ ဆိုရင္ ဒီမွာ winword ဆိုျပီးရိုက္ျပီးေတာ့ Enter ကိုႏွိပ္လိုက္နဲ ့တခါတည္းပြင့္လာမွာပါ..ဆိုေတာပ အခ်ိန္ကုန္သက္သာတာတဲ့အျပင္ typing လဲအက်င့္ျဖစ္တာေပါ့ ျပီးေတာ့အထူးသျဖင့္ ေနရာအတိအက်မသိတဲ့ဟာမ်ိဳး Registry လိုမ်ိဳးဆိုရင္လည္း Run မွာ regedit လိုရိုက္ျပီး enter ေခါက္ေပါ့ ဆိုေတာ့ Run ကအမ်ားႀကီးအက်ိဳးျပဳပါတယ္.ဒီအျပင္ Website ကိုလဲ Run မွာ လိပ္စာ ဥပမာ www.sbsangpi.blogspot.com ဆိုျပီးရိုက္ထည့္ရင္လဲဖြင့္လာမွာျဖစ္ပါတယ္.ျပီးေတာ့ Folder ေတြကိုလဲ သူရဲ႔ေနရာအတိအက်သိရင္သြားလို ့ရပါတယ္. ဥပမာ c:/windows ဆိုျပီးဖြင့္လို ့ရပါတယ္. ဆုိေတာ့ကၽြန္ေတာ္က ဒီအေၾကာင္းေလးနဲ ့အသံုး၀င္ပံုေလးကို ေျပာျပတာဘဲျဖစ္ပါတယ္.ဘာျဖစ္လို့လဲဆိုေတာ့ ေတာ္ေတာ္မ်ားမ်ားက Run မွာသံုးလို ့ရေသာ commands မ်ားဆိုျပီး တင္ေပမဲ့ အသံုးမျပဳဘူးတဲ့ သူမ်ားအတြက္အထူးအဆန္းျဖစ္မွာ စိုးလို ့ အက်ိဳးရွိပံုေလးကို ေဖာ္ျပေပးလိုပါတယ္. ေအာက္မွာ အသံုးျပဳလို ့ရေသာ commands ေလးေတြကိုေဖာ္ျပေပးလိုက္ပါတယ္.
SBSangpi(စံပီး)
| To Access… | Run Command |
|---|---|
| Accessibility Controls | access.cpl |
| Accessibility Wizard | accwiz |
| Add Hardware Wizard | hdwwiz.cpl |
| Add/Remove Programs | appwiz.cpl |
| Administrative Tools | control admintools |
| Adobe Acrobat (if installed) | acrobat |
| Adobe Designer (if installed) | formdesigner |
| Adobe Distiller (if installed) | acrodist |
| Adobe ImageReady (if installed) | imageready |
| Adobe Photoshop (if installed) | photoshop |
| Automatic Updates | wuaucpl.cpl |
| Bluetooth Transfer Wizard | fsquirt |
| Calculator | calc |
| Certificate Manager | certmgr.msc |
| Character Map | charmap |
| Check Disk Utility | chkdsk |
| Clipboard Viewer | clipbrd |
| Command Prompt | cmd |
| Component Services | dcomcnfg |
| Computer Management | compmgmt.msc |
| Control Panel | control |
| Date and Time Properties | timedate.cpl |
| DDE Shares | ddeshare |
| Device Manager | devmgmt.msc |
| Direct X Control Panel (if installed)* | directx.cpl |
| Direct X Troubleshooter | dxdiag |
| Disk Cleanup Utility | cleanmgr |
| Disk Defragment | dfrg.msc |
| Disk Management | diskmgmt.msc |
| Disk Partition Manager | diskpart |
| Display Properties | control desktop |
| Display Properties | desk.cpl |
| Display Properties (w/Appearance Tab Preselected) | control color |
| Dr. Watson System Troubleshooting Utility | drwtsn32 |
| Driver Verifier Utility | verifier |
| Event Viewer | eventvwr.msc |
| Files and Settings Transfer Tool | migwiz |
| File Signature Verification Tool | sigverif |
| Findfast | findfast.cpl |
| Firefox (if installed) | firefox |
| Folders Properties | folders |
| Fonts | control fonts |
| Fonts Folder | fonts |
| Free Cell Card Game | freecell |
| Game Controllers | joy.cpl |
| Group Policy Editor (XP Prof) | gpedit.msc |
| Hearts Card Game | mshearts |
| Help and Support | helpctr |
| HyperTerminal | hypertrm |
| Iexpress Wizard | iexpress |
| Indexing Service | ciadv.msc |
| Internet Connection Wizard | icwconn1 |
| Internet Explorer | iexplore |
| Internet Properties | inetcpl.cpl |
| Internet Setup Wizard | inetwiz |
| IP Configuration (Display Connection Configuration) | ipconfig /all |
| IP Configuration (Display DNS Cache Contents) | ipconfig /displaydns |
| IP Configuration (Delete DNS Cache Contents) | ipconfig /flushdns |
| IP Configuration (Release All Connections) | ipconfig /release |
| IP Configuration (Renew All Connections) | ipconfig /renew |
| IP Configuration (Refreshes DHCP & Re-Registers DNS) | ipconfig /registerdns |
| IP Configuration (Display DHCP Class ID) | ipconfig /showclassid |
| IP Configuration (Modifies DHCP Class ID) | ipconfig /setclassid |
| Java Control Panel (if installed) | jpicpl32.cpl |
| Java Control Panel (if installed) | javaws |
| Keyboard Properties | control keyboard |
| Local Security Settings | secpol.msc |
| Local Users and Groups | lusrmgr.msc |
| Logs You Out Of Windows | logoff |
| Malicious Software Removal Tool | mrt |
| Microsoft Access (if installed) | msaccess |
| Microsoft Chat | winchat |
| Microsoft Excel (if installed) | excel |
| Microsoft Frontpage (if installed) | frontpg |
| Microsoft Movie Maker | moviemk |
| Microsoft Paint | mspaint |
| Microsoft Powerpoint (if installed) | powerpnt |
| Microsoft Word (if installed) | winword |
| Microsoft Syncronization Tool | mobsync |
| Minesweeper Game | winmine |
| Mouse Properties | control mouse |
| Mouse Properties | main.cpl |
| Nero (if installed) | nero |
| Netmeeting | conf |
| Network Connections | control netconnections |
| Network Connections | ncpa.cpl |
| Network Setup Wizard | netsetup.cpl |
| Notepad | notepad |
| Nview Desktop Manager (if installed) | nvtuicpl.cpl |
| Object Packager | packager |
| ODBC Data Source Administrator | odbccp32.cpl |
| On Screen Keyboard | osk |
| Opens AC3 Filter (if installed) | ac3filter.cpl |
| Outlook Express | msimn |
| Paint | pbrush |
| Password Properties | password.cpl |
| Performance Monitor | perfmon.msc |
| Performance Monitor | perfmon |
| Phone and Modem Options | telephon.cpl |
| Phone Dialer | dialer |
| Pinball Game | pinball |
| Power Configuration | powercfg.cpl |
| Printers and Faxes | control printers |
| Printers Folder | printers |
| Private Character Editor | eudcedit |
| Quicktime (If Installed) | QuickTime.cpl |
| Quicktime Player (if installed) | quicktimeplayer |
| Real Player (if installed) | realplay |
| Regional Settings | intl.cpl |
| Registry Editor | regedit |
| Registry Editor | regedit32 |
| Remote Access Phonebook | rasphone |
| Remote Desktop | mstsc |
| Removable Storage | ntmsmgr.msc |
| Removable Storage Operator Requests | ntmsoprq.msc |
| Resultant Set of Policy (XP Prof) | rsop.msc |
| Scanners and Cameras | sticpl.cpl |
| Scheduled Tasks | control schedtasks |
| Security Center | wscui.cpl |
| Services | services.msc |
| Shared Folders | fsmgmt.msc |
| Shuts Down Windows | shutdown |
| Sounds and Audio | mmsys.cpl |
| Spider Solitare Card Game | spider |
| SQL Client Configuration | cliconfg |
| System Configuration Editor | sysedit |
| System Configuration Utility | msconfig |
| System File Checker Utility (Scan Immediately) | sfc /scannow |
| System File Checker Utility (Scan Once At The Next Boot) | sfc /scanonce |
| System File Checker Utility (Scan On Every Boot) | sfc /scanboot |
| System File Checker Utility (Return Scan Setting To Default) | sfc /revert |
| System File Checker Utility (Purge File Cache) | sfc /purgecache |
| System File Checker Utility (Sets Cache Size to size x) | sfc /cachesize=x |
| System Information | msinfo32 |
| System Properties | sysdm.cpl |
| Task Manager | taskmgr |
| TCP Tester | tcptest |
| Telnet Client | telnet |
| Tweak UI (if installed) | tweakui |
| User Account Management | nusrmgr.cpl |
| Utility Manager | utilman |
| Windows Address Book | wab |
| Windows Address Book Import Utility | wabmig |
| Windows Backup Utility (if installed) | ntbackup |
| Windows Explorer | explorer |
| Windows Firewall | firewall.cpl |
| Windows Magnifier | magnify |
| Windows Management Infrastructure | wmimgmt.msc |
| Windows Media Player | wmplayer |
| Windows Messenger | msmsgs |
| Windows Picture Import Wizard (need camera connected) | wiaacmgr |
| Windows System Security Tool | syskey |
| Windows Update Launches | wupdmgr |
| Windows Version (to show which version of windows) | winver |
| Windows XP Tour Wizard | tourstart |
| Wordpad | write |
SBSangpi(စံပီး)
Subscribe to:
Posts (Atom)